Measure Your Product Feed ROI with UTM Tracking, full guide
Most WooCommerce store owners invest real time and budget into product feeds without ever measuring what those feeds actually return. If you cannot measure your feed’s performance, you cannot improve it. This guide shows you how to set up UTM parameter tracking in WP Product Feed Manager, configure Google Analytics 4 to capture feed revenue, and build a dashboard that tells you exactly which feeds drive profit and which ones drain budget.
How UTM Tracking Works
When someone clicks a product in your feed and lands on your site, a UTM parameter in that URL tells Google Analytics where the click came from. Instead of grouping all your product feed traffic, UTM parameters let you see which specific feed, campaign, or content type is sending clicks and conversions. Those parameters flow into Google Analytics, where you can segment traffic by source, medium, and campaign, then match that traffic against actual purchases.
This visibility is the foundation of ROI measurement. Without it, you’re flying blind.
Setting Up UTM Parameters in WP Product Feed Manager
UTM parameters are added at the feed level in WP Product Feed Manager, then automatically appended to every product URL in that feed.
Step 1: Open your feed for editing
- Go to WP Product Feed Manager > Feeds.
- Find the feed you want to track and click Edit.
Step 2: Enable Google Analytics Tracking
- Scroll to the Google Analytics Tracking section (usually near the bottom of the feed editor).
- Check the Google Analytics Tracking checkbox.
- The Google Campaign URL Builder appears below it.
Screenshot: The feed editor shows a checkbox labeled “Google Analytics Tracking” with the URL Builder appearing directly below when enabled. (See Frame 1 in the visual guide below)
![]()
Step 3: Fill in your UTM parameters
The Google Campaign URL Builder offers 5 UTM fields. You do not need to fill all of them, but we recommend at least utm_source, utm_medium, and utm_campaign for clear reporting.
- utm_source: Where the click came from. Use
google_shoppingorgoogle_feed. - utm_medium: How the visitor arrived. Use
shoppingorpaid. - utm_campaign: The name of this specific feed or campaign. Use something descriptive like
summer_clearance_feedormens_shoes_feed. - utm_term (optional): A keyword or product attribute. Useful for A/B testing or product-level segmentation.
- utm_content (optional): Content variant for testing. Use
productfeed_linkor the product name for granular tracking.
Example setup:
- utm_source:
google_shopping - utm_medium:
shopping - utm_campaign:
electronics_feed - utm_term: (leave blank)
- utm_content: (leave blank)
Step 4: Save the feed
- Click Save or Update Feed.
- The UTM parameters are now active. Every product URL in this feed will automatically include these parameters when the feed is generated.
Tip: Use consistent naming across all your feeds. If one feed uses
google_shoppingand another uses
How UTM Parameters Flow to Google Analytics
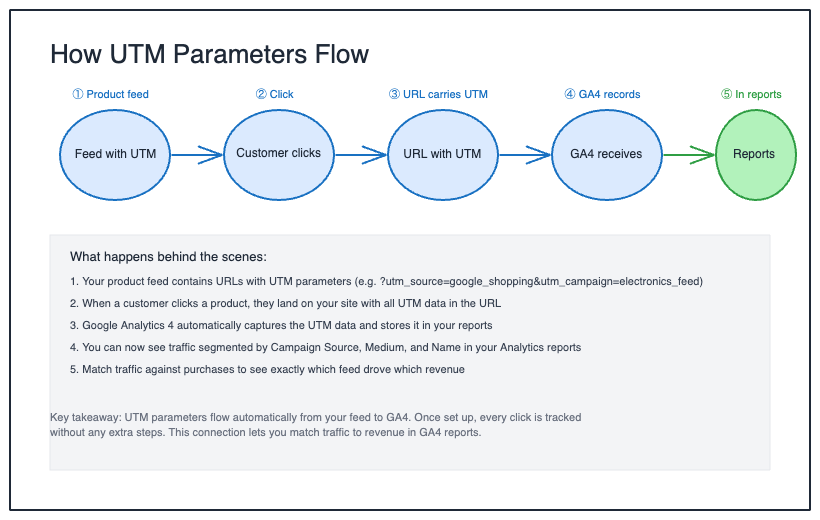
Once you save your feed with UTM parameters, here’s what happens behind the scenes:
- Your product feed contains product URLs with UTM parameters appended (e.g.,
https://yoursite.com/product?utm_source=google_shopping&utm_campaign=electronics_feed) - A customer clicks a product link from your feed
- Google Analytics receives the click with all UTM data embedded in the URL
- GA4 stores this data in your reports and makes it available for analysis
(See Frame 2 in the visual guide below for a detailed flow diagram)
Advanced: Using Shortcodes for Dynamic UTM Values
Instead of entering the same static value in every UTM field, you can use shortcodes to pull product data directly into your UTM parameters. WP Product Feed Manager supports these natively, no custom code required. Just type the shortcode into any UTM field in the Google Campaign URL Builder.
Available shortcodes
| Shortcode | What it inserts |
|---|---|
[product-title] |
The product name |
[product-id] |
The product post ID |
[product-sku] |
The product SKU |
[product-group-id] |
The product group ID attribute |
[product-brand] |
The brand attribute |
How to use them
In the feed editor, type the shortcode directly into any UTM field. For example:
- Enter
[product-sku]in the Campaign Term field to track by individual product SKU. - Enter
[product-brand]in the Campaign Content field to track by brand.
Click Save Feed. WP Product Feed Manager replaces each shortcode with the actual product value when the feed is generated.
Example
A product with SKU SHOE-001 in a feed configured as:
- utm_source:
google_shopping - utm_medium:
shopping - utm_campaign:
footwear_feed - utm_term:
[product-sku]
Generates this URL: https://yoursite.com/product?utm_source=google_shopping&utm_medium=shopping&utm_campaign=footwear_feed&utm_term=SHOE-001
Note: Shortcodes work across all sales channels — Google Shopping, Meta feeds, Microsoft Ads, and others. There are no platform-specific limitations.
Configuring Google Analytics 4 to Capture Feed Revenue
For UTM tracking to appear in reports alongside revenue data, you need to confirm that Google Analytics 4 is set up to track ecommerce events (specifically the purchase event). This is not automatic in GA4.
Verify purchase event tracking is enabled
- Go to your Google Analytics 4 property.
- Click Admin (bottom left).
- In the Data collection and modification section, click Events.
- Look for an event called
purchase. If it exists, you have ecommerce tracking enabled. If it does not appear, you will need to set it up (this requires access to your site’s Google Tag Manager or developer support).
Note: If ecommerce events are not configured, UTM data will still appear in your traffic reports, but revenue will not connect to specific UTM values. Revenue reporting depends on the purchase event being live on your site. If you are unsure whether this is set up, contact your developer or Google Ads support team to verify.
Verify data is flowing
Google Analytics can take up to 48 hours to populate reports with feed data, though basic traffic data often appears within a few hours. In the meantime, you can verify UTM parameters are being passed correctly.
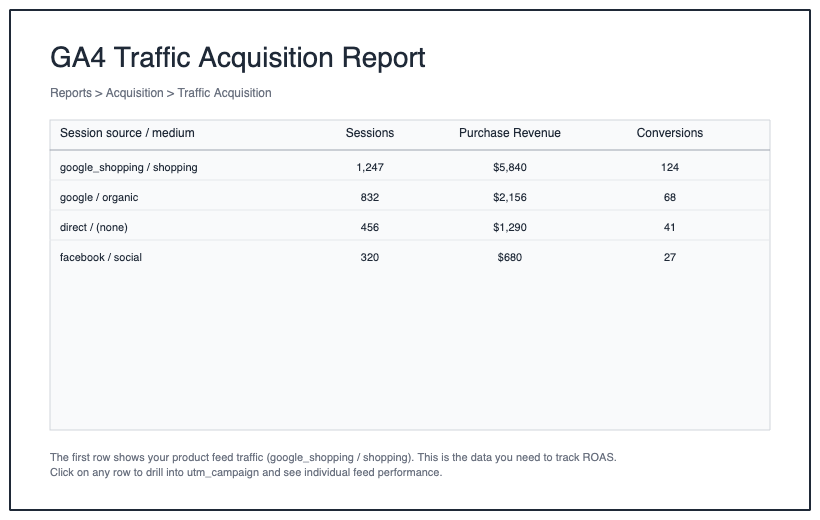
- Go to Reports > Acquisition > Traffic Acquisition.
- Look for sessions coming from your
utm_sourcevalue (e.g.,google_shopping). - If you see traffic here, your UTM setup is working. If you see no traffic after 48 hours, check that your feed is live and getting clicks.
(See Frame 3 in the visual guide below for an example of what the Traffic Acquisition report looks like)
Building Your Feed ROI Dashboard
Once data is flowing, build a custom exploration in Google Analytics 4 that shows feed performance in one place.
Create a custom exploration
- In Google Analytics 4, click Explore in the left sidebar.
- Click Blank exploration or Create new.
- Set up the exploration as follows:
Dimensions (drag into the Rows section):
- Session source
- Session medium
- Session campaign
Metrics (drag into the Values section):
- Sessions
- Purchase revenue (or ecommerce purchase revenue)
- Conversions
Filters (optional but recommended):
- Add a filter for “Session source” equals
google_shoppingto isolate feed traffic only.
- Click Run to see your results.
You now have a table showing how many sessions each feed sent, total revenue from those sessions, and total orders. This is your feed ROI dashboard.
Why Session medium? If you run multiple channels (Google Shopping, Meta feeds, Microsoft Ads), adding Session medium lets you see performance by channel type. For example, shopping medium vs social medium will show side-by-side. If you only track Google Shopping, this is optional.
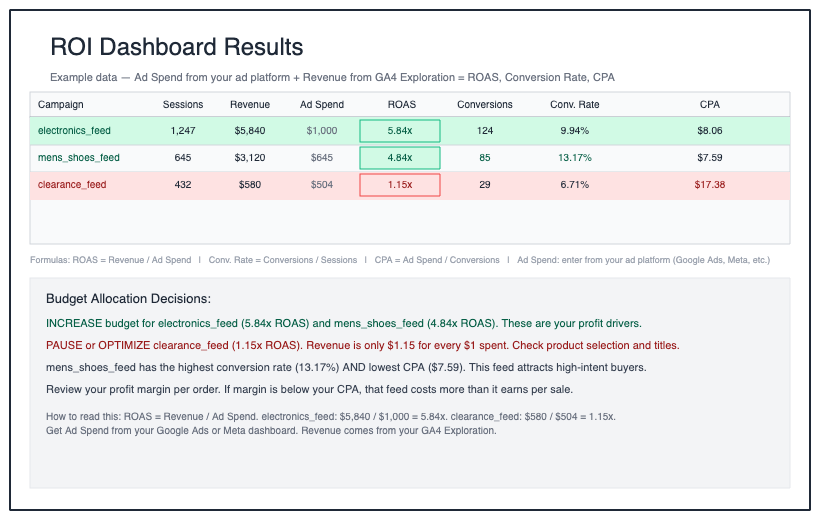
(See Frame 4 in the visual guide below for step-by-step setup instructions and Frame 5 for an example of the final results)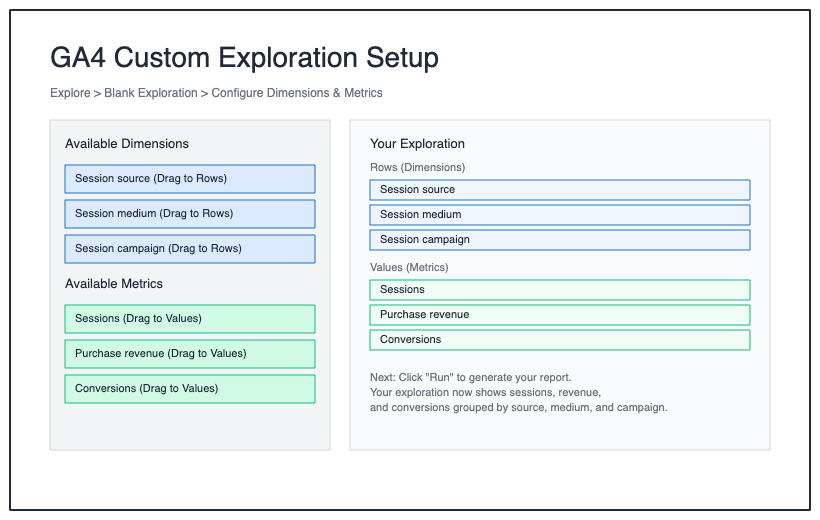
Tip: Save this exploration by clicking Save at the top. Name it “Feed ROI by Campaign” so you can return to it every week.
Key Metrics to Watch
Once your dashboard is built, focus on these three metrics to make budget decisions.
ROAS (Return on Ad Spend): How many dollars of revenue came back for every dollar you spent on ads. If a feed costs you $100 in ad spend and brings in $500 in revenue, your ROAS is 5x. Calculate it as: revenue divided by ad spend. Higher ROAS means that feed is profitable.
Conversion Rate by Channel: What percentage of clicks turned into orders. If a feed sent 1,000 sessions and 50 turned into orders, your conversion rate is 5%. Compare this across feeds to spot which ones attract higher-intent buyers.
CPA (Cost Per Acquisition): What you pay in ad spend for each completed order. If a feed costs $100 in ad spend and produced 10 orders, your CPA is $10 per order. Compare this against your average order margin to decide if that channel is worth scaling.
In your GA4 exploration, calculate these by hand:
- ROAS: purchase revenue divided by total ad spend
- Conversion rate: conversions divided by sessions
- CPA: total ad spend divided by conversions
Common Mistakes and Troubleshooting
UTM parameters are not appearing in reports
Check 1: Confirm the Google Analytics Tracking checkbox is enabled in the feed editor and you clicked Save.
Check 2: Confirm your feed is live in Google Merchant Center or your sales channel and actually receiving clicks.
Check 3: Wait 48 hours. GA4 reports can take up to 48 hours to populate.
UTM values are inconsistent or misspelled
UTM values are case-sensitive. Google_Shopping and google_shopping are two different values in reports. Go back to your feed settings and verify spelling exactly matches across all feeds.
Revenue is not connecting to UTM values
This means the purchase event is not configured in Google Analytics 4. Ecommerce events must be explicitly set up in GA4. They do not populate automatically. You will need to verify with your developer or Google Ads account manager that the purchase event is live on your WooCommerce site.
Data shows zero sessions from my UTM source
Either your feed is not live yet, or it is receiving no clicks. Check that your feed has been submitted to Google Merchant Center and is approved. Check your Merchant Center feed diagnostics to confirm no products are disapproved. If the feed is live but receiving no clicks, the feed may need optimization or additional budget. Note that data can take up to 48 hours to fully populate in reports.
Next Steps
Once you have 2-3 weeks of data, identify your top-performing feeds by ROAS and CPA.
- For high-ROAS feeds: Increase budget. These are your profit drivers.
- For low-ROAS feeds: Pause or optimize. Check if the product selection, titles, or descriptions need improvement. If optimization does not improve performance after 2 weeks, pause the feed.
- For feeds with good conversion rate but high CPA: You have qualified traffic but your ad spend is too high. Consider a channel that costs less per click.
Use this data to reallocate budget weekly. Small adjustments based on real performance compound into significant profit improvements over time.
Video tutorial
More Resources
For additional help setting up UTM tracking in WP Product Feed Manager, see:
- Adding Google Campaign URLs to Product Feeds (WP Marketing Robot help docs)
- The Complete Guide to WooCommerce Product Feed Management (includes Analytics Tracking section)
Did you find this article helpful? If you have followed the steps but still need assistance or have additional questions, we’re here to help. Please don’t hesitate to open a support ticket.

