
How to Test Your Google Shopping Product Titles (Without Touching Your Live Feed)
A client of mine was running Google Shopping on Performance Max. ROAS had slipped to 1.2. We checked bids, audience signals, creative. Nothing obvious stood out.
Then we looked at the product titles.
Every title followed the standard template: descriptive name, then attributes. “Premium Cotton Crewneck T-Shirt Black.” Correct by every guide you can find. Not optimized for how people actually search.
We rewrote the top 50 titles to front-load the key search attributes in the first 20 characters: gender, color, product type, size. Same bids, same images, same campaigns. Nothing else changed. Two weeks later: impressions up 140%, CTR from 0.9% to 2.1%, CPC down 15%.
That result came from a title change. Not a bidding adjustment. Not a new campaign structure.
Why best practices only get you so far
Every Google Shopping guide recommends roughly the same title structure: front-load the key attributes, use the first 70 characters carefully, stay under 150 total. Those best practices are a solid starting point. But “correct” and “optimized for your store” are not the same thing.
What works depends on your category, your price point, your audience. A title structure that drives strong CTR for a fashion retailer may do nothing for a tools supplier. The only way to know is to test on your own data.
Most store owners never do this. Not because they don’t care, but because there is no obvious way to test titles without editing the live feed and risking something breaking.
There is a cleaner approach.
How the feed chain works — and where titles matter
The path from your WooCommerce store to a Google Shopping impression runs through a specific chain: product data in WooCommerce → product feed → Google Merchant Center → Shopping auction. The title attribute is one of the primary signals Google uses at the auction level to match your products to search queries.
A Google Merchant Center supplemental data source sits inside that chain. It connects to your primary feed and can override specific attributes for any product it shares an id with. Title is one of those attributes. The supplemental source cannot add or remove products from your catalog. It only updates what is already there.
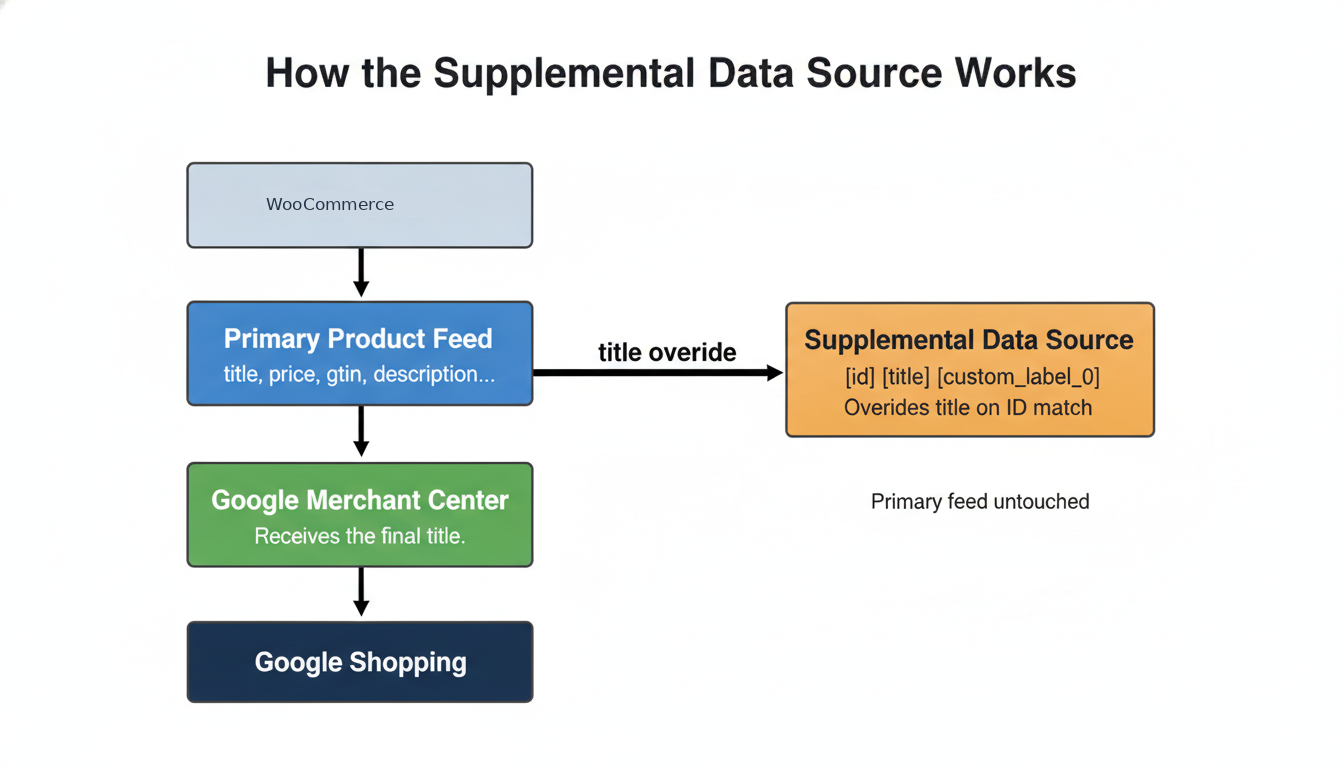
This means you can push test titles to a subset of products without touching the primary feed at all. If the test performs well, you update the primary feed with the winning titles. If it doesn’t, you remove the supplemental source and nothing has changed.
One prerequisite: the “Advanced data source management” add-on must be active in Merchant Center. Go to Settings > Add-ons > Discover tab and activate it. It is free. Without it, the supplemental sources tab does not appear.
What you need before you start
- WP Product Feed Manager installed, with a primary Google Shopping feed already running
- The “Advanced data source management” add-on activated in Merchant Center
- A test cohort of 20 to 50 products from the same category, similar price range, similar performance history
- One variable to test. Front-loading different attributes, adding a size or fit descriptor, moving the brand name. One change per test.
Step 1: Pick your cohort and define the title change
Choose 20 to 50 products from one category. Aim for at least 100 clicks across the test period for your cohort. That is the minimum for a readable CTR trend, not for statistical significance. If you want reliable conversion rate conclusions, you need considerably more volume. Treat the result as a directional signal, not a controlled experiment.
One variable. Not five. One.
A fashion retailer I worked with wanted to know whether adding size and fit descriptors to titles made a measurable difference. We pulled a cohort from their catalog and changed one thing: added size and fit attributes to each title. The result: impressions up 13.19%, clicks up 3.51%. Projected across their full catalog, that translates to an additional 100,000+ impressions and 584 clicks per month. From a single attribute addition.
Before building the feed, decide on two things: which products are in the cohort (you will use the Product Filter to define this), and what title formula you want to test. The formula is built from existing WooCommerce product attributes, for example: Product Title + color attribute + size attribute. Or: color + size + Product Title, if you are testing front-loading. Make sure those attributes are populated in WooCommerce for the products in your cohort before continuing.
Step 2: Build the override feed in WP Product Feed Manager
Create a new feed in WP Product Feed Manager and select Google Merchant Center as the channel. The Google Feed Type defaults to Google Product Feed — leave it there. The dropdown also lists a “Supplemental Feeds” section with other types (Product Review Feed, Merchant Promotions Feed, and others) that serve different purposes. None of those apply here. What makes this feed function as a supplemental data source in Merchant Center is not the feed type you choose in the plugin, but what you do in Attribute Mapping.
In the Attribute Mapping section, set every attribute to “Remove from feed” using the source dropdown. Every attribute except three: [id], [title], and [custom_label_0].
One detail that matters here: [id] must match exactly the id your primary feed uses. If your primary feed maps [id] to Post ID, set Post ID here. If it uses SKU, use SKU. Merchant Center matches products by id. A mismatch means the override never applies. No error is shown. It simply does nothing.
For [title], set the source to “Combine source fields.” This lets you chain existing WooCommerce product attributes into a new title structure. Select the attributes in the order you want them to appear in the title, with a space as separator between each. This formula applies to every product the feed includes, which is why defining the cohort in the Product Filter is the step that limits which products get the new title.
For [custom_label_0], use “Fill with a static value” and enter a consistent label for this test, for example “title-test”. This is how you isolate exactly these products in Google Ads reporting when you measure.
Use the Product Filter to limit the feed to your test cohort. Filter by shop category, product tag, or another field that identifies the 20 to 50 products you selected. Only products that pass the filter appear in the supplemental feed, so only their titles are overridden in Merchant Center. Full documentation on the Product Filter is here.
Save and generate the feed. For more on attribute mapping in WP Product Feed Manager, see the full guide here.
Step 3: Upload as a supplemental data source in Merchant Center
In Merchant Center, go to Settings > Data sources. Open the “Supplemental sources” tab and click “Add supplemental product data.”
Enter the feed URL from WP Product Feed Manager. Merchant Center fetches the feed, matches each product by [id], and overrides the title with the value from the supplemental source. No attribute rules needed for a basic title override. That is the default behavior.
Step 4: Run the test
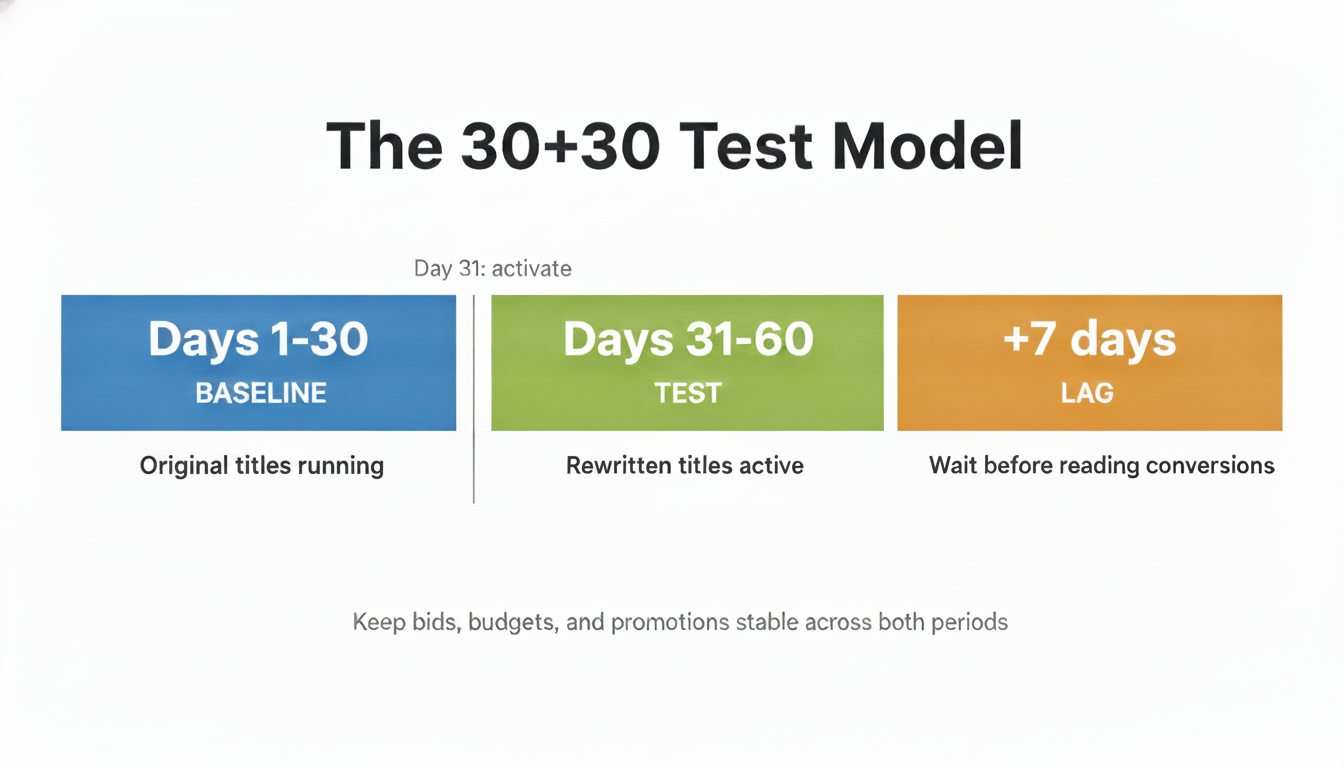
Use a 30+30 model. Days 1 through 30 are your baseline: the test cohort runs on its existing titles, no supplemental feed active. On Day 31, activate the supplemental source. Days 31 through 60 are the test period.
Worth being clear about what this test is and what it is not: this is not a simultaneous split test. One version runs, then the other. That means you are comparing across time, not across traffic. Keep everything else stable across both periods: bids, budgets, campaigns, promotions. Pay particular attention to seasonal events. A sale, a peak shopping week, or a bank holiday falling in one window and not the other will make the comparison unreliable. If a promotion is coming, schedule around it or wait until after.
After Day 60, wait another 7 days before pulling conversion data. Conversion lag means purchases from the final days of the test period may not be attributed yet.
Step 5: Measure in Google Ads
In your Shopping campaigns, segment performance by [custom_label_0] and filter for “title-test”. This shows you data only for your test cohort products, not the rest of the catalog.
Compare the two 30-day periods: impressions, CTR, and conversion rate. A meaningful signal is a 10 to 15% relative change in CTR. Smaller movements are harder to act on confidently without more volume.
If the test titles win: update the primary feed with the new titles and remove the supplemental source. If they do not: remove the supplemental source and test a different hypothesis next time.
The system is the point
One test gives you one answer. Useful. But not where the real value is.
Once the supplemental feed infrastructure is in place, the next test takes an afternoon to set up. You build up real data on what title structures work for your specific products and your specific audience. Each test costs almost nothing. The results compound over time.
Best practices tell you what should work in general. Your own test results tell you what works for your store. If you have the volume to run this, following your own data is the edge. That is what separates stores that keep improving their Google Shopping performance from the ones reading the same guides and getting the same results.
Frequently asked questions
What is a supplemental data source in Google Merchant Center? A supplemental data source is a secondary feed you connect to your primary product feed in Merchant Center. When a product id appears in both, the supplemental source overrides the attributes it includes. It cannot add or remove products from your catalog, only update existing attributes. For title testing, this means you can push rewritten titles to a subset of products without changing the primary feed.
Does the id in my supplemental feed need to match my primary feed? Yes, exactly. Merchant Center matches products between primary and supplemental feeds by id. If your primary feed maps [id] to Post ID, the supplemental feed must also use Post ID. If it uses SKU, use SKU. A mismatch means the override is never applied. No error is shown. The supplemental feed is simply ignored for those products.
How many products do I need for a reliable title test? Aim for 20 to 50 products in the same category with a similar price range and performance history. The minimum useful volume is 100 clicks across the test period for a directional CTR read. If your cohort does not reach that volume in 30 days, either extend the test, expand the cohort, or pick higher-volume products. For conversion rate conclusions, you need considerably more than 100 clicks.
How long should a Google Shopping title test run? The 30+30 model works well: 30 days of baseline, then 30 days of test. Allow an additional 7 days after the test period before reading conversion data, to account for conversion lag. Avoid running the test across seasonal events or promotions. A sale window in one period and not the other makes the before/after comparison unreliable.
What is the difference between a supplemental feed test and Google’s Product Data Experiments? Google’s Product Data Experiments is a native Merchant Center feature that runs a simultaneous 50/50 A/B test, splitting impressions between two title variants at the same time. As of early 2026, it is in limited beta and not available to all advertisers. The supplemental feed method is a sequential test: one title version runs for 30 days, then the other. It is available to anyone with Merchant Center and WP Product Feed Manager, but it compares across time rather than across traffic, a key limitation to keep in mind when reading results.
