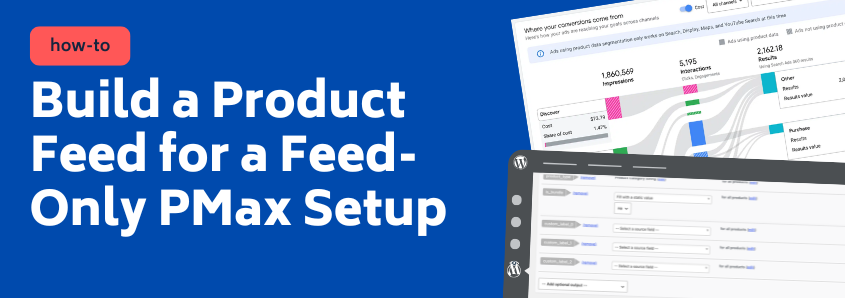
How to Build a WooCommerce Product Feed for a Feed-Only PMax Setup
Key insights:
- In feed-only PMax, your product feed is the entire ad. With no headlines, images, or video, the feed alone decides what you match against and how you show up. Every weakness in it is exposed directly to the auction.
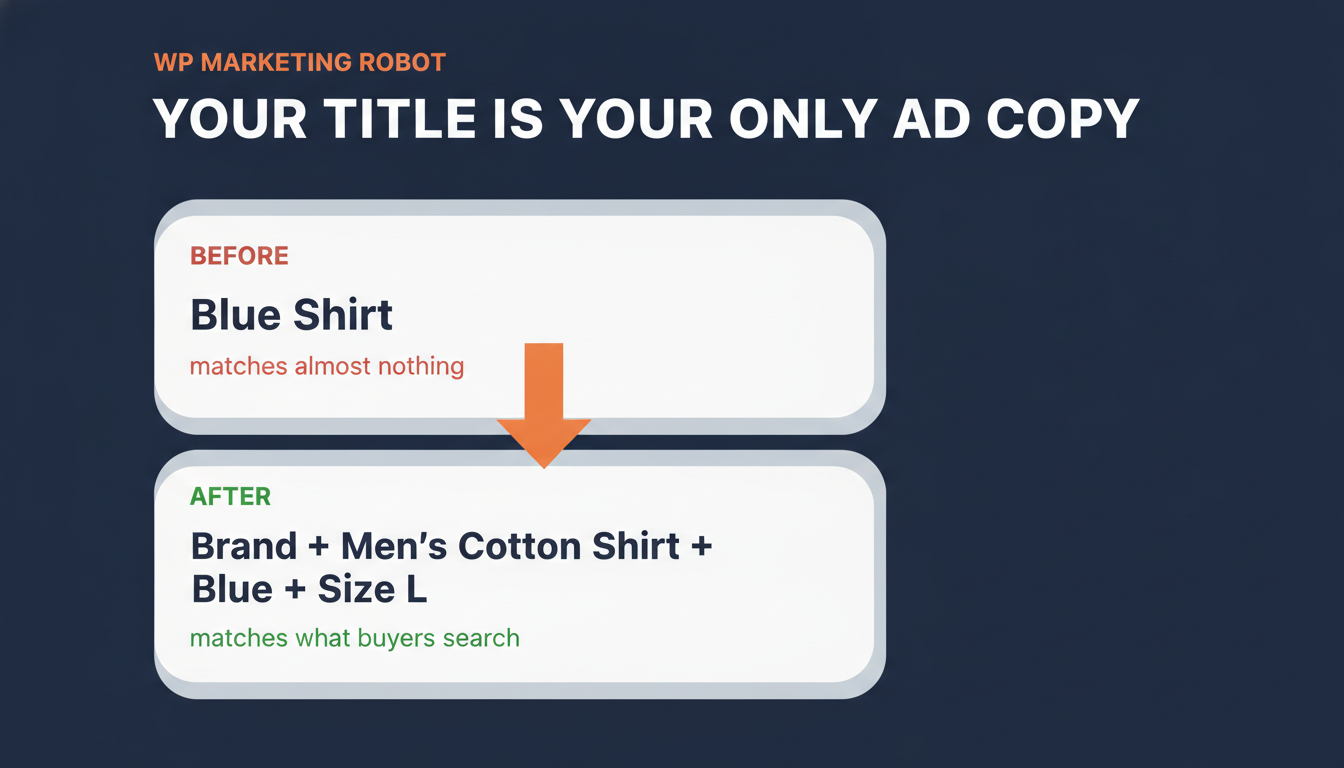
- The product title is where most feeds lose. Pushing the raw WooCommerce product name (“Blue Shirt”) into the title attribute matches almost nothing a buyer types. A structured title (“Brand + Men’s Cotton Shirt + Blue + Size L”) matches the searches that convert.
- Google blocks the obvious setup path on purpose. You cannot save an assetless campaign in Google Ads directly. You create it from Google Merchant Center, then turn off Final URL Expansion and Automatically Created Assets so Google does not rebuild the assets for you.
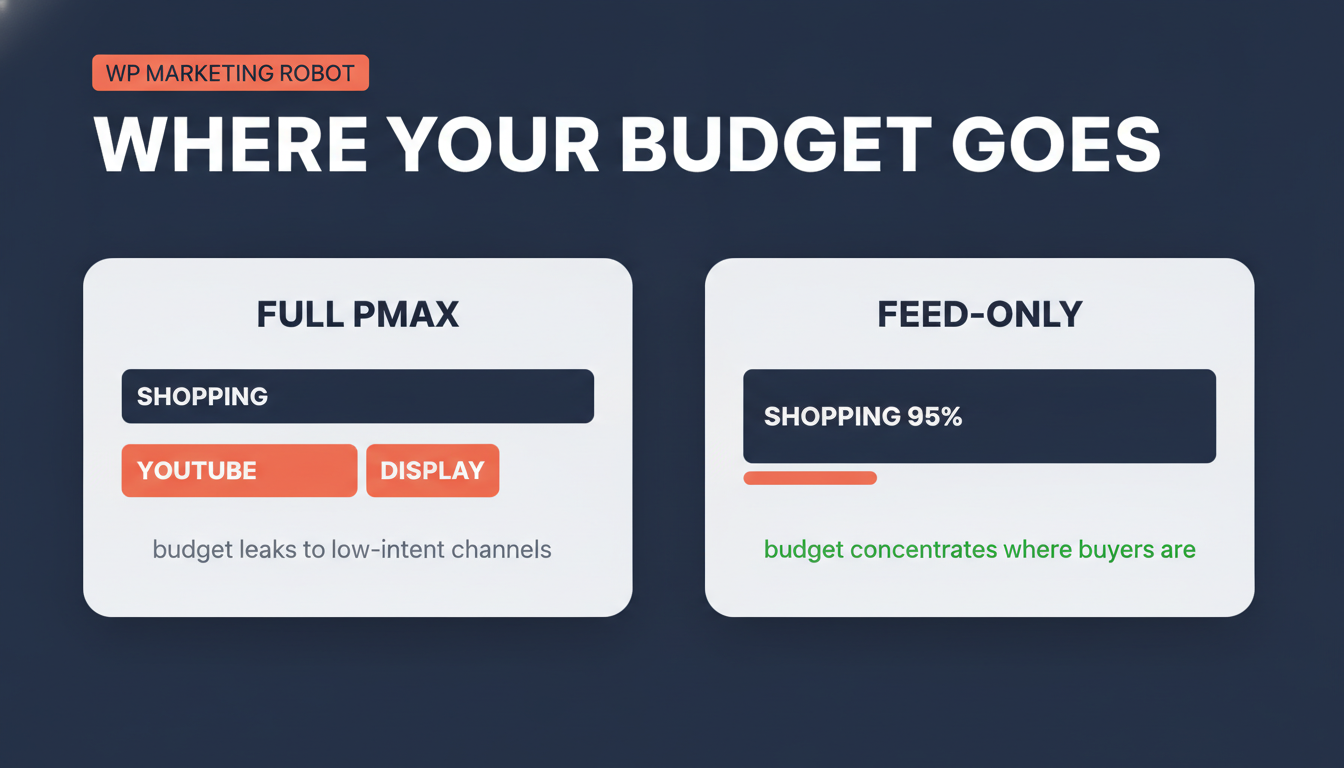
- A correct feed-only setup runs around 95% of traffic on Shopping. It still serves dynamic remarketing, but without assets it cannot run Search, Display, or video. You confirm the split with the PMax Insights script.
- Build the feed to last. A 500×500 minimum image (Google’s 2027 floor), correct GTINs, accurate categories, and an automatic refresh keep the feed approved and current once the campaign concentrates all spend on it.
You read the case for a feed-only Performance Max campaign and you were convinced. No creative assets, no budget leaking into YouTube impressions, the algorithm constrained to the Shopping network where the buyers actually are.
Now the catch. The moment you strip the assets out of a Performance Max campaign, your product feed becomes the entire ad. There is no headline to carry a weak product title. There is no lifestyle image to compensate for a bad product photo. The feed does all the work, and a weak feed has nowhere to hide.
I see store owners get the campaign structure exactly right and then hand it a feed they built in five minutes. The campaign is the easy half. The feed is where this is won or lost.
This is a build guide. Part one is the feed, attribute by attribute, in WP Product Feed Manager. Part two is the feed-only campaign itself, including the workaround Google forces on you. Follow it in order and you will have a feed-only setup live by the end.
Why the Feed Carries Everything Here
In a standard Performance Max campaign, your assets act as a cushion. A vague title gets covered by the headline. A poor product image gets covered by a lifestyle photo and a video. The asset stack hides the cracks in your product data.
Feed-only removes the cushion. Every weakness in your feed is exposed directly to the auction. A thin title matches fewer queries. A missing GTIN filters the product out before it competes. A bad image quietly kills your click-through rate, and you have nothing else to show.
That is the reason to build the feed properly first. Get it right and feed-only is the most precise Shopping setup available to a WooCommerce store. So we start with the feed.
Part One: Build the Feed in WP Product Feed Manager
I build these feeds in WP Product Feed Manager, because feed-only leaves no room for the approximations a generic export produces. When the feed is the ad, you need control over every attribute. The steps below assume the plugin is installed and your license is active.
Step 1: Create the Feed and Pick the Channel
In WordPress admin, go to the “Product Feed” menu and open “Manage Channels”. Find Google Shopping in the list and click “Install”. You only do this once per channel.
Then create a new feed and give it a descriptive name. Choose the Google channel, set the country you are targeting, and set a default Google product category for your catalog. This default is the fallback Google uses when a product has no more specific category, so pick the one that fits the bulk of your range.
Step 2: Set the Update Schedule
Set the feed to refresh automatically. This is the schedule on which the plugin rebuilds the feed so prices, stock, and new or removed products stay current.
Do this now, at creation, rather than later. A feed-only campaign concentrates all your spend on Shopping, which means stale price or stock data does direct damage. An out-of-date feed gets products disapproved in Merchant Center, and disapproved products in a feed-only setup are pure dead weight. This is exactly why manual feed updates quietly sabotage Google Shopping performance. Set the refresh and the feed keeps itself honest.
Step 3: Map Your Categories to Google Categories
Use the category mapping tool to select which WooCommerce categories go into the feed, and map each one to the right Google product category.
Do not leave this on the default for everything. The Google category is part of how Google decides which queries your product is eligible for. Your WooCommerce categories and Google’s taxonomy are two different languages, and the mapping is where you translate between them. In feed-only, where the feed alone decides what you match against, precise categorization is precise matching. Map each category deliberately.
Step 4: Decide How Variations Appear
If you sell variable products, open the variations setting and choose how they appear in the feed: the parent product, individual variations, or a combination.
For most Shopping setups you want individual variations, so each color or size becomes its own product the shopper can match and click. There is one trap here worth knowing. If you map a parent-level attribute, the feed outputs every variation value comma-separated in one field, “30ml, 50ml, 100ml” in a single row, instead of a clean row per variant. Map the variation-level field so each feed row carries its own value.
Step 5: Build the Title, Your Only Ad Copy
This is the step that decides a feed-only campaign, and it is the one most stores get wrong.
Each feed attribute has a source dropdown next to it that controls where the plugin pulls the value from. The default behavior for the title attribute is to take the raw WooCommerce product name. So the feed goes out with a title like “Blue Shirt”. In a normal campaign that survives, because the headline fills the gap. In feed-only there is no headline. That title is the only copy Google has to match against a search, and “Blue Shirt” matches almost nothing a buyer types.
Build a structured title instead. In the title attribute’s source dropdown, choose “Combine source fields”. This lets you stitch several WooCommerce fields, and static text, into one title. Combine them so “Blue Shirt” becomes “Brand + Men’s Cotton Shirt + Blue + Size L”. Now you match searches for the brand, the material, the color, and the size, the exact terms high-intent shoppers use. Same product, far more of the right traffic.
Set this once with the combine function and every product follows the same pattern. This is the single highest-leverage thing you will do in the whole build.
Step 6: Set GTIN and Brand, the Eligibility Gate
A product with a missing or wrong GTIN can be filtered out before it reaches the auction. It does not lose, it does not even compete. Missing GTIN, MPN, and brand are among the most common reasons Merchant Center rejects products, and they are one of the warning signs of a sick product feed that quietly make products invisible on Google.
In the feed builder, map the GTIN attribute to the WooCommerce field where you store it, and map brand to an accurate source. Do not leave GTIN blank and do not let it fill with something arbitrary. If you genuinely have no GTIN for a product line, that is a different conversation about identifier exemptions, but never ship a wrong one. This is the gate that decides whether a product is allowed into the auction at all.
Step 7: Get the Image Right
In a feed-only setup the product image is the whole creative. There is no second image, no video, no lifestyle shot. What is in the feed is what the shopper sees.
By default the feed pulls the featured product image into the image_link attribute. Check it is a clean product shot, the correct product, with no watermarks or promotional text overlaid, those get products rejected. On size, Google is raising the minimum to 500×500 pixels for all products from January 31, 2027, and recommends 1500×1500, so build to at least 500×500 now rather than the old 100×100 floor that is about to expire. An undersized image does not get the product disapproved. It simply will not be shown, which is exactly the kind of quiet failure that costs you traffic with nothing flagging it. If you want to supply more angles, scroll to the bottom of the feed editor, click “Add optional output”, select additional_image_link, and map it to your image library.
Step 8: Add Custom Labels for Control
Custom labels are how you take back control inside a campaign that otherwise runs on autopilot. They do two jobs, and WP Product Feed Manager can build both from your real store data.
Turn on Performance Prioritizing. The plugin ranks every product into High, Mid, and Low tiers based on actual WooCommerce sales data over a period you set. Map that tier to a custom label, for example custom_label_0, and you can separate your proven performers from dead stock inside the campaign and push budget toward what converts.
For the second job, segmentation by economics, map a second custom label to margin or price tier. Now you can treat your high-margin lines differently from the rest instead of letting every product compete on equal footing regardless of what it earns you. Those same labels are what let you split products into listing groups per asset group once you want finer control over the campaign. Keep this light to start. Even a performance label and a margin label give you more control than most feed-only campaigns ever use.
Step 9: Generate and Submit
Generate the feed. The plugin produces the feed URL. Submit that URL in Google Merchant Center so your products are live and approved there. With the automatic update from Step 2 running, the feed now keeps itself in sync.
That is the feed built. Now the campaign.
Part Two: Build the Feed-Only Campaign
With a clean, complete feed in Merchant Center, you create the campaign. This is where Google works against you, because it does not make a feed-only campaign easy to set up by design.
Step 1: Create the Campaign From Merchant Center, Not Google Ads
Google Ads now blocks you from saving an asset group with no headlines and no images. Build the campaign directly in Google Ads and the interface will not let you finish. This is the single most reported obstacle on the forums: people make it to the last step and cannot save.
The way around it: create the campaign from inside Google Merchant Center, under “Marketing” then “Ad Campaigns”. Built from there, it comes through with a single asset group and without forcing assets on you. Once it appears in Google Ads, you finish the configuration there.
Step 2: Turn Off the Two Settings That Undo Feed-Only
In Google Ads, two settings will quietly rebuild the asset behavior you just avoided unless you switch them off.
Turn off Final URL Expansion. Left on, Google sends traffic to URLs it picks across your site rather than the product pages your feed points to.
Turn off Automatically Created Assets. Left on, Google scrapes your site and generates its own headlines and images, which puts you straight back into the asset-driven behavior feed-only exists to prevent.
Both off. This is the step that actually makes the campaign feed-only rather than feed-only in name.
Step 3: Set Location Targeting to Presence
Set location targeting to “Presence”, people in or regularly in your targeted locations. Google’s default also includes people who merely show interest in your locations, which widens your reach into traffic far less likely to buy. Presence keeps you on the people who are actually there.
Step 4: Fill Only the Mandatory Asset Fields
You still have to fill the mandatory fields even though you are adding no creative. Leave every headline, description, image, and video field blank. Complete your Business Name and a Call-to-Action. The campaign will not run without those two, and they do not pull you out of feed-only.
What Success Looks Like
A correctly built feed-only campaign concentrates almost entirely on the Shopping network. In a typical setup, around 95% of traffic goes to Shopping, because that is where the buying intent is and, with no assets, it is the only place Google can show your products. It still serves dynamic remarketing, but without assets it cannot run Search, Display, or video.
You confirm this with the PMax Insights script. It produces the channel breakdown the standard Google Ads interface hides, so you can see exactly where your budget went. If Shopping is carrying the overwhelming majority of your traffic and revenue, the setup is doing its job. If meaningful spend is still leaking elsewhere, go back and check the two settings in Part Two, Step 2.
The Takeaway
The campaign structure is the easy half. The workaround is a fixed set of steps you do once. The feed is where a feed-only setup is actually won or lost, and the product title is where most feeds lose it. A campaign built perfectly on top of “Blue Shirt” titles will underperform a sloppier campaign built on titles that match what buyers search for.
Build the feed as if it is the only thing running, because in a feed-only setup it is.
Once your campaign is live, run the PMax Insights script and look at your channel split. That single chart tells you whether the setup is doing what you built it to do.
Frequently Asked Questions
Is it still possible to create a feed-only PMax campaign?
Yes. Google Ads blocks you from saving an asset group with no headlines or images, which is why people report being unable to finish the setup. The way around it is to create the campaign from inside Google Merchant Center under “Marketing” then “Ad Campaigns”, then finish the configuration in Google Ads. Once there, turn off Final URL Expansion and Automatically Created Assets so Google does not generate its own assets.
How do you create a feed-only PMax campaign step by step?
Create the campaign from Google Merchant Center under “Marketing” then “Ad Campaigns”, not from Google Ads directly. When it appears in Google Ads, turn off Final URL Expansion and Automatically Created Assets, set location targeting to “Presence”, and leave every headline, description, image, and video field blank. Fill only the mandatory Business Name and Call-to-Action. The campaign then runs on your product feed alone.
What is the point of a feed-only PMax campaign?
It concentrates your budget on the Shopping network instead of letting Performance Max spread it across YouTube and Display, where a full-asset PMax often sends 15 to 21 percent of spend for a fraction of the sales. For a WooCommerce store running real ad spend, that means more of your budget reaches shoppers with buying intent. The tradeoff is that the feed does all the work, so a weak feed has nowhere to hide.
Can Performance Max remarketing work with feed-only campaigns?
Yes. A feed-only campaign still serves dynamic remarketing alongside the Shopping network. What it cannot do without assets is run Search, Display, or video placements, because Google has no headlines, images, or video to build those ads from. So you keep bottom-of-funnel shopping and remarketing reach while cutting the asset-driven spend.
What makes a product feed good enough for a feed-only setup?
The title carries the most weight, because with no headline it is the only ad copy Google has, so build a structured title rather than the raw product name. Beyond that: correct GTINs and brand so products are eligible, accurate Google product categories so you match the right queries, and a clean product image of at least 500×500 pixels (Google’s minimum from January 31, 2027). An automatic feed refresh keeps prices and stock current so products are not disapproved.

Leave a Reply
Want to join the discussion?Feel free to contribute!