Google Shopping Title Optimization: How to Craft Winning Titles for Maximum Impact
Introduction to title optimization
In the dynamic and competitive landscape of online retail, Google Shopping has emerged as a pivotal platform for businesses to showcase their products. At the heart of this platform’s effectiveness lies the art of crafting compelling product titles. This chapter delves into the critical role of product titles in Google Shopping and explores how optimized titles can significantly enhance ad performance, driving both visibility and sales.
Importance of Product Titles in Google Shopping
Product titles in Google Shopping are more than mere identifiers; they are the cornerstone of a product’s online presence. In a marketplace where consumers are inundated with choices, the title of a product acts as a primary filter, guiding potential customers to what they seek. It’s the first interaction point and often the deciding factor in whether a shopper clicks on a product or scrolls past it.
The significance of product titles extends beyond just attracting attention. In Google Shopping, titles are instrumental in how products are indexed and displayed in response to search queries. A well-crafted title, rich in relevant keywords and product specifics, aligns closely with the search intent of users. This alignment is crucial for ensuring that your products surface in the right searches, reaching the audience most likely to convert.
Overview of the Impact of Optimized Titles on Ad Performance
Optimizing product titles for Google Shopping is not just about adhering to best practices; it’s about understanding and leveraging the nuances of consumer behavior and search algorithms. An optimized title can dramatically transform the performance of your ads in several ways:
- Enhanced Visibility: Titles that are carefully optimized with the right keywords and product details are more likely to rank higher in Google Shopping searches. This increased visibility means more eyes on your products, which is the first step in driving sales.
- Improved Click-Through Rates (CTR): A title that succinctly and accurately describes the product resonates with the right audience. When shoppers see a title that matches their search intent, they are more inclined to click on the ad, thus improving the CTR.
- Higher Conversion Rates: Optimized titles not only attract clicks but also set the right expectations. When a product title clearly communicates what the product is, shoppers are less likely to face surprises on the product page, leading to higher chances of conversion.
- Cost-Effective Advertising: In the pay-per-click model of Google Shopping, every click counts. Optimized titles ensure that the clicks you get are from potential buyers, making your advertising spend more efficient.
In the following sections, we will explore the strategies and techniques to optimize product titles, common pitfalls to avoid, and industry-specific best practices. The goal is to empower you with the knowledge to craft titles that not only capture attention but also drive meaningful engagement and sales.
2. Understanding the Role of Product Titles
In the realm of Google Shopping, the product title is not just a label; it’s a powerful tool that can significantly influence the success of your online advertising efforts. This chapter focuses on understanding the multifaceted role of product titles in shaping ad visibility and click-through rates, as well as their interaction with Google’s sophisticated search algorithm.
How Product Titles Influence Ad Visibility and Click-Through Rates
Product titles are the forefront of your Google Shopping ads. They serve as the critical link between what a shopper searches for and the products you offer. The effectiveness of these titles in capturing attention and generating interest directly impacts your ad’s visibility and the likelihood of a shopper clicking through to your product page.
- Visibility: In the crowded online marketplace, visibility is paramount. A product title that is clear, descriptive, and includes relevant keywords can significantly enhance the visibility of your ads. Google’s algorithm tends to favor titles that closely match the user’s search query, thereby increasing the chances of your ad appearing in search results.
- Click-Through Rates (CTR): The CTR of an ad is a direct measure of its relevance and appeal to the audience. A compelling product title that accurately reflects the search intent of the user is more likely to resonate and result in a click. Titles that are concise, yet informative, and highlight unique selling points or key features of the product tend to have higher CTRs.
The Relationship Between Product Titles and Google’s Search Algorithm
Google’s search algorithm is a complex system designed to match users’ search queries with the most relevant and useful results. Product titles play a crucial role in this process, acting as a primary source of information for the algorithm to assess relevance.
- Keyword Relevance: The algorithm evaluates the keywords in your product titles against the search queries entered by users. Titles that effectively incorporate relevant keywords are more likely to be deemed relevant by the algorithm, thus improving the product’s ranking in search results.
- Quality Score: Google assigns a quality score to each product ad, which influences both its ranking and cost-per-click. A well-optimized product title contributes to a higher quality score by improving relevance and user experience, leading to better ad placement and potentially lower advertising costs.
- Semantic Search: Google’s algorithm is increasingly adept at understanding the context and intent behind search queries. This means that product titles need to go beyond keyword stuffing and instead focus on creating meaningful, contextually relevant titles that align with the likely intent of the searcher.
In summary, product titles are a critical element in the success of Google Shopping campaigns. They not only attract and engage potential customers but also communicate with Google’s algorithm to improve ad performance. The next sections will delve into practical strategies for optimizing product titles, ensuring they serve both your business goals and the needs of your customers.
3. Key Strategies for Title Optimization
Optimizing product titles in Google Shopping is a blend of art and science. It requires a strategic approach to ensure that each title is not only informative and relevant but also engaging and search-friendly. This chapter outlines key strategies to optimize product titles effectively.
Utilizing the Full Character Limit Effectively
Google Shopping allows up to 150 characters for product titles, offering ample space to describe your product comprehensively. However, it’s crucial to use this space wisely:
- Balance Detail with Brevity: While it’s tempting to use all 150 characters, clarity and conciseness are key. Aim for titles that are detailed yet succinct, avoiding unnecessary filler words.
- Front-Loading Key Information: Since only a portion of the title may be visible in certain views, ensure that the most critical information is placed at the beginning.
- Adapting to Mobile Views: With a significant portion of users shopping on mobile devices, it’s important to craft titles that are easily readable on smaller screens.
Incorporating Relevant Attributes (Brand, Size, Color, etc.)
Including relevant attributes in your product titles can significantly enhance their appeal and relevance:
- Brand Name: If you’re selling products from well-known brands, include the brand name in the title. It can be a major draw for brand-loyal customers.
- Size and Color: For products where size and color are important, such as clothing or accessories, make sure these details are prominently featured in the title.
- Unique Attributes: Highlight unique or special features of the product that set it apart from competitors.
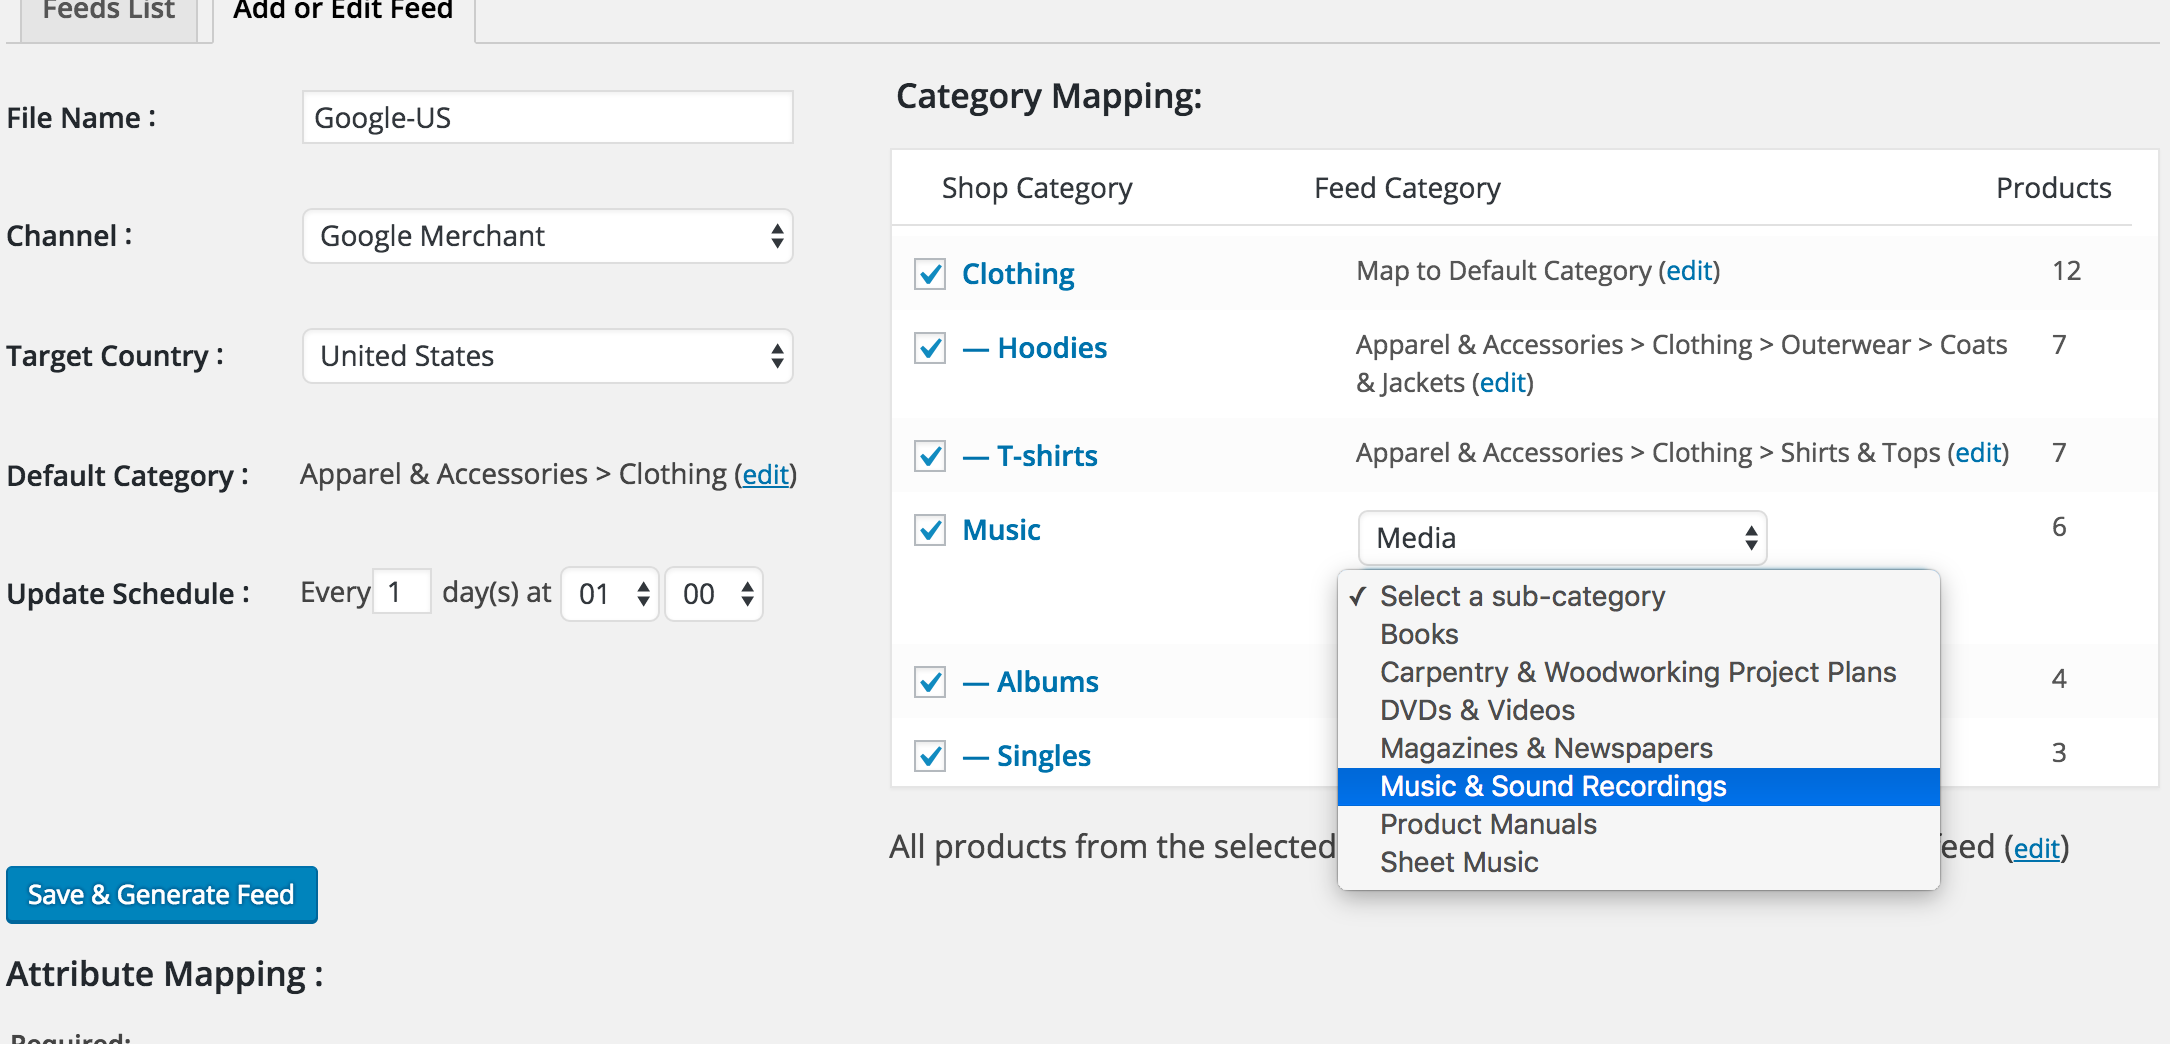
To include the relevant attributes in your title, using our Product Feed Manager, you can simply combine them, like below:
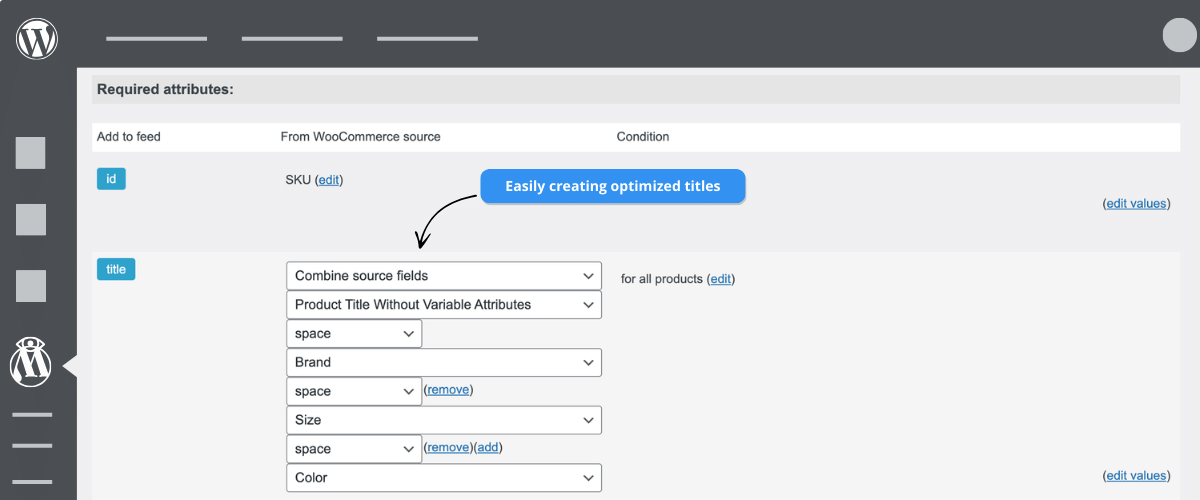
Easily create optimized titles in WooCommerce Product Feed Manager
Prioritizing Important Information at the Beginning of the Title
The structure of your product title can impact its effectiveness:
- Most Important First: Always start with the most critical information. This could be the brand, product type, or a key feature.
- Consider Search Habits: Think about how your customers search for products like yours and structure your titles accordingly. For instance, if consumers typically search by product type, start with that.
Using Customer-Centric Language and Integrating Important Keywords
To resonate with your audience and perform well in searches, your titles should be crafted with the customer in mind:
- Speak the Customer’s Language: Use terminology and phrases that your customers use. This not only improves relevance but also makes your titles more relatable.
- Keyword Integration: Conduct thorough keyword research to identify terms your customers are using in their searches. Integrate these keywords naturally into your titles.
- Avoid Jargon: Unless you’re targeting a very niche market, avoid industry jargon that might confuse the average customer.
By implementing these strategies, you can create product titles that not only capture the essence of your products but also align with the needs and search behaviors of your target audience. This alignment is crucial for driving visibility, clicks, and ultimately, conversions.
4. Advanced Techniques for Enhanced Performance
To truly excel in the competitive landscape of Google Shopping, it’s essential to go beyond basic optimization and employ advanced techniques. These methods focus on refining your approach to product title optimization, ensuring that your titles not only attract attention but also drive performance. This chapter explores three key advanced techniques.
Creating Distinct Titles for Product Variants
When selling products with multiple variants, such as different colors, sizes, or features, it’s crucial to create distinct titles for each variant:
- Highlight Unique Features: For each variant, emphasize the feature that differentiates it from others. For example, if you’re selling a shirt in multiple colors, make sure the color is prominently mentioned in each variant’s title.
- Consistency with Variation: Maintain a consistent structure across all variants while changing the specific details. This approach helps in brand recognition and makes it easier for customers to find the exact variant they are looking for.
- Avoid Duplication: Ensure that each title is unique to prevent confusion and improve the searchability of each product variant.
Balancing Readability and Keyword Inclusion
A well-optimized title must strike a balance between being keyword-rich and reader-friendly:
- Natural Keyword Integration: Instead of stuffing titles with keywords, integrate them in a way that reads naturally. Remember, your titles are primarily for customers, not just search engines.
- Focus on User Intent: Understand the intent behind the keywords your customers use and craft titles that address this intent. This approach ensures that your titles are not only keyword-optimized but also resonate with the user’s needs.
- Readable and Engaging: Ensure that your titles are easy to read and engaging. A title that is a jumble of keywords may rank well but could fail to attract clicks if it doesn’t make sense to the shopper.
Leveraging Optimization Tools for Data-Driven Improvements
Utilizing data-driven tools can significantly enhance the effectiveness of your title optimization efforts:
- Analytics Tools: Use tools like Google Analytics to understand how users interact with your listings. Look for patterns in the titles of high-performing products and apply these insights to optimize other titles.
- A/B Testing Tools: Implement A/B testing to compare different title variations and identify which elements resonate most with your audience. This method allows for continuous improvement based on actual performance data.
- Feed Management Tools: Enhance your optimization process with our advanced WooCommerce Product Feed Manager tool. Designed to automate and simplify your workflow, this powerful tool excels in bulk editing titles and intelligently crafting optimized product titles. It leverages product attributes and WooCommerce Product sources, ensuring uniformity and coherence throughout your entire product catalog for maximum impact.
By employing these advanced techniques, you can further refine your product titles, making them more targeted, relevant, and effective. This approach not only enhances the visibility of your products in Google Shopping but also drives better engagement and conversion rates.
5. Common Pitfalls to Avoid
While optimizing product titles for Google Shopping, it’s just as important to be aware of common pitfalls as it is to implement best practices. Certain mistakes can not only diminish the effectiveness of your titles but also negatively impact your ad’s performance and reputation. This chapter highlights key pitfalls to avoid in your title optimization journey.
Overuse of Capitalization and Promotional Text
- Capitalization: Excessive use of capital letters can make titles appear aggressive or spammy, which can deter potential customers. Use capitalization judiciously, primarily for brand names or to highlight a specific feature, ensuring that the title remains easy to read and professional in appearance.
- Promotional Language: While it’s tempting to include promotional phrases like “Best Offer”, “Discount”, or “Sale” in your titles, this can backfire. Google Shopping prefers straightforward, descriptive titles. Promotional content can be seen as misleading or as an attempt to game the search algorithm, leading to lower ad rankings or even disapproval of your listings.
Misleading or Inaccurate Titles
- Accuracy is Key: Ensure that your titles accurately reflect the product. Misleading titles may increase clicks initially, but they lead to poor user experience, increased bounce rates, and lower conversion rates. This not only affects your immediate sales but can also harm your brand’s reputation in the long run.
- Consistency with Product Page: The information in your title should match the details on the product page. Inconsistencies between the title and the product page can confuse customers and may be flagged by Google, affecting your ad’s performance.
Excessive Use of Abbreviations or Acronyms
- Understandability: While abbreviations and acronyms can save space, they may not be understood by all customers. Use common and widely understood abbreviations, and avoid industry-specific jargon unless you are targeting a niche market.
- Balance with Clarity: If using abbreviations is essential, balance them with clear, descriptive language elsewhere in the title. This approach ensures that while you are optimizing space, you are not sacrificing the title’s clarity and understandability.
By steering clear of these common pitfalls, you can ensure that your product titles are not only optimized for Google Shopping’s algorithms but are also appealing and clear to your potential customers. This balance is crucial for driving both short-term clicks and long-term customer trust and loyalty.
6. Continuous Optimization and Testing
In the ever-evolving landscape of online retail and search engine algorithms, resting on your laurels is not an option. Continuous optimization and testing are key to staying ahead of the curve and ensuring your Google Shopping campaigns remain effective and competitive. This chapter focuses on the importance of regular updates, A/B testing, and data analysis in refining your product title strategies.
The Importance of Regular Title Updates and A/B Testing
- Staying Relevant: Regularly updating product titles ensures they remain relevant and in tune with current market trends, seasonal changes, and consumer search behaviors. This practice is vital for maintaining the visibility and attractiveness of your ads.
- A/B Testing for Google Shopping Title Optimization: A/B testing, or split testing, is a method of comparing two versions of a product title to see which one performs better. You can gain valuable insights into what resonates best with your audience by systematically testing different elements of your titles, such as keyword placement, structure, or the inclusion of specific attributes.
- Implementing A/B Tests: Start by changing one element at a time in your product title to understand its impact. For instance, test different keyword orders, the presence or absence of brand names, or the inclusion of specific product features.
- Measuring Results: Use key performance indicators (KPIs) like click-through rate (CTR), conversion rate, and return on ad spend (ROAS) to measure the impact of each variation.
Analyzing Performance Data to Refine Strategies
- Data-Driven Decisions: Utilize tools like Google Analytics and Google Ads to gather data on how your product titles are performing. Look for patterns in the titles of high-performing products and apply these learnings to optimize other titles.
- Key Metrics to Monitor: Pay close attention to metrics such as CTR, conversion rate, average cost per click (CPC), and overall ad spend. These metrics provide insights into not only how attractive your titles are but also how well they convert interest into sales.
- Responding to Data: Be prepared to make swift changes based on your findings. If certain titles consistently underperform, analyze and revise them. Conversely, if a particular structure or phrasing works well, consider applying it to other products in your catalog.
- Seasonal and Market Trends: Stay attuned to changes in market trends and consumer behavior. For example, during holiday seasons, incorporating relevant keywords and phrases into your titles can capture more seasonal traffic.
Continuous Title optimization in Google Shopping and testing are not just about improving performance; they are about understanding your audience better and aligning your offerings more closely with their needs and search behaviors. This ongoing process ensures that your Google Shopping campaigns remain dynamic, relevant, and effective in driving both traffic and conversions.
7. Best Practices and Examples per Industry Vertical
Crafting effective product titles for Google Shopping requires an understanding that different industries have unique needs and customer expectations. This chapter provides insights into tailoring product titles to meet industry-specific requirements and showcases examples of optimized titles across various verticals.
Tailoring Product Titles According to Industry-Specific Needs
Each industry has its own set of attributes that customers prioritize when searching for products. Understanding these nuances is key to creating titles that resonate with your target audience.
- Apparel and Fashion: Focus on brand, size, color, and style. Customers often search for clothing items based on these attributes.
- Electronics and Gadgets: Highlight brand, model number, and technical specifications like storage capacity or screen size. Shoppers in this category tend to look for specific models and features.
- Home and Garden: Emphasize the type of product, material, and intended use or room. For example, customers might search for “outdoor waterproof garden furniture” or “stainless steel kitchen knife set.”
- Beauty and Personal Care: Include the brand, product type (e.g., moisturizer, lipstick), and specific concerns or benefits (e.g., “for sensitive skin,” “long-lasting”).
- Sports and Fitness: Focus on the type of equipment, intended use (e.g., “running,” “yoga”), and any special features or technologies.
Examples of Optimized Titles in Different Verticals
Here are examples of optimized product titles for various industries, demonstrating how to incorporate key attributes effectively:
- Apparel and Fashion: “Levi’s Women’s Skinny Jeans – Size 8, Dark Blue, Stretch Denim”
- Electronics and Gadgets: “Samsung Galaxy S21 Ultra – 256GB, Phantom Black, 5G Smartphone”
- Home and Garden: “Ergonomic Office Chair with Lumbar Support – Mesh Back, Adjustable Arms”
- Beauty and Personal Care: “Clinique Dramatically Different Moisturizing Lotion+ – 125ml, For Dry to Dry Combination Skin”
- Sports and Fitness: “Nike Air Zoom Pegasus 37 Men’s Running Shoes – Size 10, Breathable Mesh, Black”
In each of these examples, the titles are structured to highlight the most-searched-for attributes in their respective categories. They provide clear, concise information that aligns with what customers in these verticals are likely to search for, thereby increasing the chances of the product being found and clicked on.
By tailoring your product titles to meet the specific needs and search behaviors of your industry, you can significantly enhance the visibility and appeal of your products in Google Shopping. This targeted approach ensures that your titles are not only optimized for search algorithms but also resonate with the preferences and requirements of your customers.
8. Conclusion
As we conclude this guide on optimizing product titles for Google Shopping, it’s important to reflect on the key insights and strategies that have been discussed. The journey through the chapters underscores the pivotal role of title optimization in the success of your online retail strategy.
Summarizing the Importance of Title Optimization in Google Shopping
Title optimization in Google Shopping is not just a task; it’s a strategic endeavor that can significantly impact your online presence and sales. The right titles can enhance visibility, improve click-through rates, and ultimately drive conversions. They are the first point of contact between your product and potential customers, acting as a decisive factor in the crowded digital marketplace.
Effective title optimization involves understanding and implementing best practices tailored to your specific industry, audience, and product offerings. It’s about striking a balance between being descriptive and concise, integrating relevant keywords without compromising readability, and continuously adapting to changing market trends and consumer behaviors.
Encouraging Ongoing Testing and Refinement for Best Results
The landscape of online shopping and consumer search behaviors is constantly evolving. Therefore, title optimization is not a one-time effort but an ongoing process. Regular testing and refinement of your product titles are crucial to stay ahead of the competition and align with the latest search engine algorithms and consumer trends.
-
- Embrace A/B Testing: Regularly conduct A/B tests to compare different title variations. This approach allows you to understand what resonates best with your audience and leads to higher engagement and conversion rates.
- Analyze and Adapt: Use analytics tools to monitor the performance of your product titles. Analyze key metrics such as click-through rates and conversion rates to identify what works and what doesn’t. Be ready to adapt your strategy based on these insights.
- Stay Informed and Responsive: Keep abreast of the latest trends in your industry and changes in Google’s algorithms. Respond quickly to these changes by updating your titles to maintain relevance and effectiveness.
Start optimizing your Google Shopping titles with our Product Feed Manager.
To streamline this process and harness the full potential of your Google Shopping titles, we encourage you to download Our Product Feed Manager. This tool is designed to simplify and enhance the optimization process, offering features like bulk editing and dynamic title creation based on product attributes. With Our Product Feed Manager, you can ensure consistency across your product catalog, saving time and resources while maximizing the impact of your titles.
In conclusion, remember that title optimization is not a one-time task but a continuous journey. By leveraging Our Product Feed Manager, you can embark on this journey with confidence, equipped with the tools and insights needed to craft titles that resonate with your audience and drive your e-commerce success. Start Optimizing your Google Shopping Product Titles with Our Product Feed Manager today and start optimizing your Google Shopping titles for a brighter, more profitable online presence.