Measure Your Product Feed ROI with UTM Tracking

Most WooCommerce store owners invest real time and budget into product feeds without ever measuring what those feeds actually return. If you cannot measure your feed’s performance, you cannot improve it. This guide shows you how to set up UTM parameter tracking in WP Product Feed Manager, configure Google Analytics 4 to capture feed revenue, and build a dashboard that tells you exactly which feeds drive profit and which ones drain budget.

How UTM Tracking Works

When someone clicks a product in your feed and lands on your site, a UTM parameter in that URL tells Google Analytics where the click came from. Instead of grouping all your product feed traffic, UTM parameters let you see which specific feed, campaign, or content type is sending clicks and conversions. Those parameters flow into Google Analytics, where you can segment traffic by source, medium, and campaign, then match that traffic against actual purchases.

This visibility is the foundation of ROI measurement. Without it, you’re flying blind.

Setting Up UTM Parameters in WP Product Feed Manager

UTM parameters are added at the feed level in WP Product Feed Manager, then automatically appended to every product URL in that feed.

Step 1: Open your feed for editing

  1. Go to WP Product Feed Manager > Feeds.
  2. Find the feed you want to track and click Edit.

Step 2: Enable Google Analytics Tracking

  1. Scroll to the Google Analytics Tracking section (usually near the bottom of the feed editor).
  2. Check the Google Analytics Tracking checkbox.
  3. The Google Campaign URL Builder appears below it.

Screenshot: The feed editor shows a checkbox labeled “Google Analytics Tracking” with the URL Builder appearing directly below when enabled. (See Frame 1 in the visual guide below)

Step 3: Fill in your UTM parameters

The Google Campaign URL Builder offers 5 UTM fields. You do not need to fill all of them, but we recommend at least utm_source, utm_medium, and utm_campaign for clear reporting.

  • utm_source: Where the click came from. Use google_shopping or google_feed.
  • utm_medium: How the visitor arrived. Use shopping or paid.
  • utm_campaign: The name of this specific feed or campaign. Use something descriptive like summer_clearance_feed or mens_shoes_feed.
  • utm_term (optional): A keyword or product attribute. Useful for A/B testing or product-level segmentation.
  • utm_content (optional): Content variant for testing. Use productfeed_link or the product name for granular tracking.

Example setup:

  • utm_source: google_shopping
  • utm_medium: shopping
  • utm_campaign: electronics_feed
  • utm_term: (leave blank)
  • utm_content: (leave blank)

Step 4: Save the feed

  1. Click Save or Update Feed.
  2. The UTM parameters are now active. Every product URL in this feed will automatically include these parameters when the feed is generated.

Tip: Use consistent naming across all your feeds. If one feed uses google_shopping and another uses google, your reports will split the data unnecessarily. Choose a naming convention and stick to it.


How UTM Parameters Flow to Google Analytics

Once you save your feed with UTM parameters, here’s what happens behind the scenes:

  1. Your product feed contains product URLs with UTM parameters appended (e.g., https://yoursite.com/product?utm_source=google_shopping&utm_campaign=electronics_feed)
  2. A customer clicks a product link from your feed
  3. Google Analytics receives the click with all UTM data embedded in the URL
  4. GA4 stores this data in your reports and makes it available for analysis

(See Frame 2 in the visual guide below for a detailed flow diagram)

detailed UTM flow diagram

Advanced: Using Dynamic Shortcodes for UTM Parameters

Is this section for you? This section is for store owners who manage many feeds or want product-level tracking details (e.g., tracking each product SKU separately in analytics). It requires either PHP knowledge or a willingness to use a free plugin. If you’re happy with your static UTM setup from Step 3 above, you can skip this section.

For store owners who want to populate UTM values dynamically based on product data (for example, using the product SKU or brand in your UTM campaign name), WP Product Feed Manager supports built-in shortcodes via a PHP filter.

Instead of entering static UTM values in the Google Campaign URL Builder, you can use shortcodes that automatically pull data from each product. This is useful if you manage dozens of feeds and want the same tracking logic applied across all of them without manual setup per feed.

Supported shortcodes

  • [product-title] – pulls the product name
  • [product-id] – pulls the product post ID
  • [product-sku] – pulls the product SKU
  • [product-group-id] – pulls the product group ID attribute
  • [product-brand] – pulls the brand attribute

Setup (developers or using the Code Snippets plugin)

Option A: Using the Code Snippets plugin (recommended for non-developers)

If you are not comfortable editing PHP directly, you can use the free Code Snippets plugin. This plugin lets you add PHP code through the WordPress admin without touching functions.php.

  1. Install and activate the Code Snippets plugin.
  2. Go to Snippets > Add New in your WordPress admin.
  3. Copy the PHP code below (under “Option B”) and paste it into the snippet editor.
  4. Click Save and Activate.

For a detailed walkthrough, watch this video: Using Code Snippets Plugin

Option B: Manual PHP edit (for developers)

If you prefer to edit PHP directly:

  1. Open your site’s functions.php file (in Appearance > Theme File Editor or via SFTP/FTP in /wp-content/themes/your-theme/), or create a custom plugin file.
  2. Add this PHP function:
<?php
function product_feed_manager_google_campaign_url( $attributes, $feed_id, $product_id ) {
    // Get the product object
    $product = wc_get_product( $product_id );

    // Check if the product exists
    if ( ! $product ) {
        return $attributes;
    }

    // Prepare data for replacements
    $product_title = urlencode( $product->get_name() );
    $product_id = $product->get_id();
    $product_sku = urlencode( $product->get_sku() );
    $product_group_id = $attributes['item_group_id'];
    $product_brand = $attributes['brand'];

    // Retrieve the existing URL from attributes
    $url = isset( $attributes['link'] ) ? $attributes['link'] : '';

    // Replace shortcodes with actual values
    $url = str_replace( '[product-title]', $product_title, $url );
    $url = str_replace( '[product-id]', $product_id, $url );
    $url = str_replace( '[product-sku]', $product_sku, $url );
    $url = str_replace( '[product-group-id]', $product_group_id, $url );
    $url = str_replace( '[product-brand]', $product_brand, $url );

    // Update the attributes array with the modified URL
    $attributes['link'] = $url;

    return $attributes;
}

add_filter( 'wppfm_feed_item_value', 'product_feed_manager_google_campaign_url', 10, 3 );
  1. Save the file.

Once the code is in place (both options):

  1. In the WP Product Feed Manager feed editor, use shortcodes in the utm_term or utm_content fields. For example:
    • Enter [product-sku] in utm_term to track by product SKU.
    • Enter [product-brand] in utm_content to track by brand.
  2. Save the feed. WP Product Feed Manager will replace the shortcodes with the actual product data when the feed is generated.

Example

If your product has SKU SHOE-001 and brand Nike, a feed with:

  • utm_source: google_shopping
  • utm_medium: shopping
  • utm_campaign: footwear_feed
  • utm_term: [product-sku]

Will generate a URL like: https://yoursite.com/product?utm_source=google_shopping&utm_medium=shopping&utm_campaign=footwear_feed&utm_term=SHOE-001

Warning: Dynamic shortcodes require PHP knowledge and access to your site’s functions.php or a custom plugin file. If you are not comfortable editing PHP, contact a developer or open a support ticket and we can help you set this up.

Note: Dynamic shortcodes work across all sales channels (Google Shopping, Meta feeds, Microsoft Ads, etc.). There are no known limitations when using shortcodes with UTM parameters across different platforms. This feature is universal to WP Product Feed Manager.

Configuring Google Analytics 4 to Capture Feed Revenue

For UTM tracking to appear in reports alongside revenue data, you need to confirm that Google Analytics 4 is set up to track ecommerce events (specifically the purchase event). This is not automatic in GA4.

Verify purchase event tracking is enabled

  1. Go to your Google Analytics 4 property.
  2. Click Admin (bottom left).
  3. In the Data collection and modification section, click Events.
  4. Look for an event called purchase. If it exists, you have ecommerce tracking enabled. If it does not appear, you will need to set it up (this requires access to your site’s Google Tag Manager or developer support).

Note: If ecommerce events are not configured, UTM data will still appear in your traffic reports, but revenue will not connect to specific UTM values. Revenue reporting depends on the purchase event being live on your site. If you are unsure whether this is set up, contact your developer or Google Ads support team to verify.

Verify data is flowing

Google Analytics can take up to 48 hours to populate reports with feed data, though basic traffic data often appears within a few hours. In the meantime, you can verify UTM parameters are being passed correctly.

  1. Go to Reports > Acquisition > Traffic Acquisition.
  2. Look for sessions coming from your utm_source value (e.g., google_shopping).
  3. If you see traffic here, your UTM setup is working. If you see no traffic after 48 hours, check that your feed is live and getting clicks.

(See Frame 3 in the visual guide below for an example of what the Traffic Acquisition report looks like)

example of what the Traffic Acquisition report looks like

Building Your Feed ROI Dashboard

Once data is flowing, build a custom exploration in Google Analytics 4 that shows feed performance in one place.

Create a custom exploration

  1. In Google Analytics 4, click Explore in the left sidebar.
  2. Click Blank exploration or Create new.
  3. Set up the exploration as follows:

Dimensions (drag into the Rows section):

  • Session source
  • Session medium
  • Session campaign

Metrics (drag into the Values section):

  • Sessions
  • Purchase revenue (or ecommerce purchase revenue)
  • Conversions

Filters (optional but recommended):

  • Add a filter for “Session source” equals google_shopping to isolate feed traffic only.
  1. Click Run to see your results.

You now have a table showing how many sessions each feed sent, total revenue from those sessions, and total orders. This is your feed ROI dashboard.

Why Session medium? If you run multiple channels (Google Shopping, Meta feeds, Microsoft Ads), adding Session medium lets you see performance by channel type. For example, shopping medium vs social medium will show side-by-side. If you only track Google Shopping, this is optional.

(See Frame 4 in the visual guide below for step-by-step setup instructions and Frame 5 for an example of the final results)GA4 custom exploration

Tip: Save this exploration by clicking Save at the top. Name it “Feed ROI by Campaign” so you can return to it every week.

Key Metrics to Watch

Once your dashboard is built, focus on these three metrics to make budget decisions.

ROAS (Return on Ad Spend): How many dollars of revenue came back for every dollar you spent on ads. If a feed costs you $100 in ad spend and brings in $500 in revenue, your ROAS is 5x. Calculate it as: revenue divided by ad spend. Higher ROAS means that feed is profitable.

Conversion Rate by Channel: What percentage of clicks turned into orders. If a feed sent 1,000 sessions and 50 turned into orders, your conversion rate is 5%. Compare this across feeds to spot which ones attract higher-intent buyers.

CPA (Cost Per Acquisition): What you pay in ad spend for each completed order. If a feed costs $100 in ad spend and produced 10 orders, your CPA is $10 per order. Compare this against your average order margin to decide if that channel is worth scaling.

In your GA4 exploration, calculate these by hand:

  • ROAS: purchase revenue divided by total ad spend
  • Conversion rate: conversions divided by sessions
  • CPA: total ad spend divided by conversions

Common Mistakes and Troubleshooting

UTM parameters are not appearing in reports

Check 1: Confirm the Google Analytics Tracking checkbox is enabled in the feed editor and you clicked Save.

Check 2: Confirm your feed is live in Google Merchant Center or your sales channel and actually receiving clicks.

Check 3: Wait 48 hours. GA4 reports can take up to 48 hours to populate.

UTM values are inconsistent or misspelled

UTM values are case-sensitive. Google_Shopping and google_shopping are two different values in reports. Go back to your feed settings and verify spelling exactly matches across all feeds.

Revenue is not connecting to UTM values

This means the purchase event is not configured in Google Analytics 4. Ecommerce events must be explicitly set up in GA4. They do not populate automatically. You will need to verify with your developer or Google Ads account manager that the purchase event is live on your WooCommerce site.

Data shows zero sessions from my UTM source

Either your feed is not live yet, or it is receiving no clicks. Check that your feed has been submitted to Google Merchant Center and is approved. Check your Merchant Center feed diagnostics to confirm no products are disapproved. If the feed is live but receiving no clicks, the feed may need optimization or additional budget. Note that data can take up to 48 hours to fully populate in reports.

Next Steps

Once you have 2-3 weeks of data, identify your top-performing feeds by ROAS and CPA.

  • For high-ROAS feeds: Increase budget. These are your profit drivers.
  • For low-ROAS feeds: Pause or optimize. Check if the product selection, titles, or descriptions need improvement. If optimization does not improve performance after 2 weeks, pause the feed.
  • For feeds with good conversion rate but high CPA: You have qualified traffic but your ad spend is too high. Consider a channel that costs less per click.

Use this data to reallocate budget weekly. Small adjustments based on real performance compound into significant profit improvements over time.


More Resources

For additional help setting up UTM tracking in WP Product Feed Manager, see:


Did you find this article helpful? If you have followed the steps but still need assistance or have additional questions, we’re here to help. Please don’t hesitate to open a support ticket.

WPMR Agentic Checkout for WooCommerce: Setup Guide

Extensions

Back Up Your Product Feeds

Set Up Custom Labels for Margin-Based Campaign Splitting

Setup-Guide: Agentic Checkout Plugin for WooCommerce

Using Performance Prioritizing in Product Feed Manager

Setup your product feed

Setting up your product feed in the Woo Product Feed Manager is a straightforward process. Follow the steps below to install a channel, configure your feed, and optimize your product listings for better performance across multiple platforms.

1. Installing a Channel in the Channel Manager

For each sales channel, we have a so-called template that will help you create a valid feed for the chosen channel. Before you can start building a product feed, you will need to activate the channel template you would like to create a product feed for. So if you want to create a product feed for Google Shopping, you should install the Google channel from within the Channel Manager.

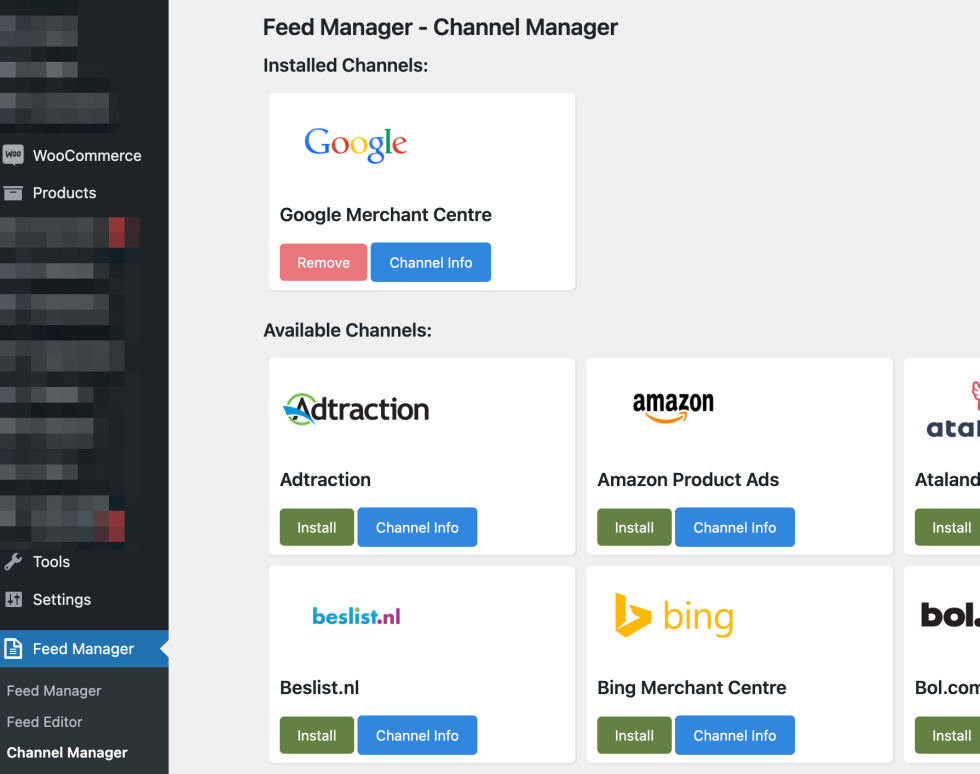
To activate and use one or more channels click the Channel Manager link in the feed manager menu. You will get the Channel Manager page where you can manage your channel templates, and activate, remove, and update them.

2. Create and setup a new feed

To create your first feed click the “Feed Manager” link in the Feed Manager menu. You will see the Feed list where you can manage your feeds. When you start this list will be empty. Click the “Add new feed” button.

File naming and channel choice

After clicking the button the screen will show you a form where you can enter details about your feed like filename and the channel template you want to choose.

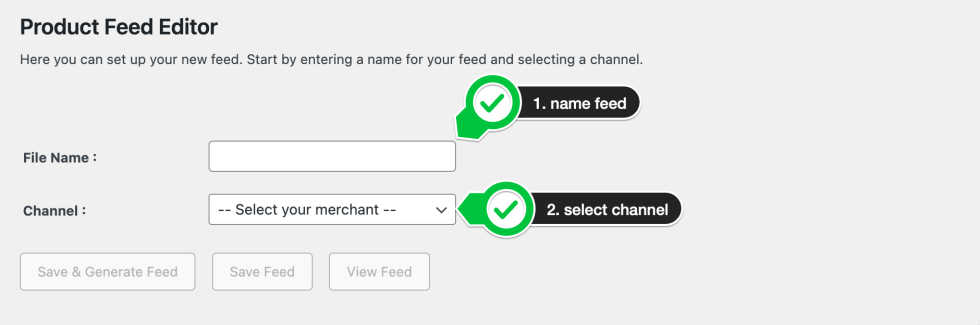
After you have selected the channel more fields will show up where you can enter even more information like Target country, Default category, include product variations, and on the right the category mapping section. The fields that show up will differ depending on the channel you have chosen and their requirements.

3. Default channel category and category mapping

The default channel category should be setup before you start with the category mapping. The default category shows a dropdown with the required or recommended channel category. When you choose a category witch has subcategories the subcategories will open so you can find easily the right default categories for your webshop.

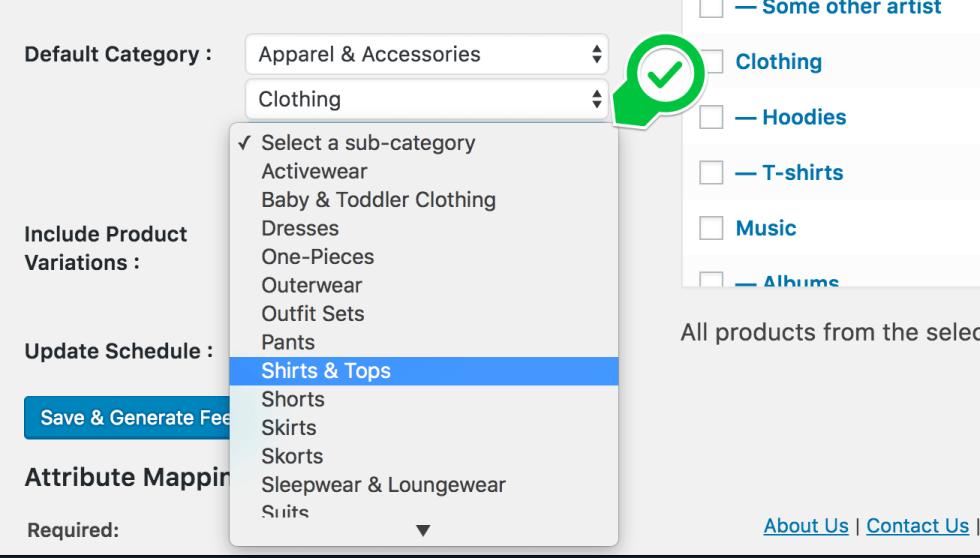
After you have chosen a default category, you can map your shop categories to channel categories. To map the shop categories, you click the checkbox next to the shop category you want to include in your product feed. By default, the marked shop category is mapped to the default channel category you have set before. When you click the edit link next to “Map to Default Category,” a drop-down is shown where you can change the mapped channel category to a more suitable channel category.

Note

You must select at least one shop category. The category mapping tools will act as a filter, ensuring that only products from the selected category are included in the feed. If no category is chosen, products from that category will not appear in the feed. Therefore, it is essential to include at least one shop category to generate a feed

4. Include product variations

After mapping your shop categories you can select the checkbox “Include Product Variations”. When you select this your product variations will be included as separate products in your product feed. The plugin will also make sure that the url to the product variation will show the user the chosen product variation without the use of an additional plugin.

5. Automated schedule

With the schedule function of the plugin you can set an interval for when the plugin will automatically recreate the product feed so you will not have to update the feed manually each time you alter products.

6. Advance product filters

With the advanced filters, you can streamline your product feed by filtering out items based on specific values from the product source fields. This allows you to exclude products with, for instance, certain IDs or SKU numbers or those priced below a specified amount. This gives you the ability to exclude products that may not be profitable.

To add filters to your feed, click the “Edit” link located beneath the category mapping section, where it states: “All products from the selected Shop Categories will be included in the feed.” A row with drop-down menus will then appear, allowing you to use product source field values to determine which products should be excluded.

7. Attribute mapping

In the last step, you have to map the attributes of your channel feeds to the data source of your store. When using a channel template, we have already set most of the feed attributes and connected them to a correct WooCommerce source field. This allows for minimal editing with the provided feed settings, so you can save the feed and submit it to the chosen channel.

How to work with Attribute Mapping

In the attribute mapping section, you will see three columns: “Add to feed”, “From WooCommerce source” and “Condition”. The “add to feed” column shows you the channel feed attribute. The “from WooCommerce source” shows you the WooCommerce source field we have connected as the best choice for the feed attribute. Under “condition” you can create advanced conditions and edit the values from the WooCommerce source.

Required and optional attributes

Every channel has its own required and optional fields. We give you the option to setup all possible attributes and show you what attributes are required, highly recommended, recommended and optional.

We have added required and highly recommended attributes to the tool and set the correct WooCommerce source field wherever possible. Under recommended and optional attributes you can pick attributes from the dropdown to include in the feed and have that way full controle in what you want to show and what not.

Out of the box the feed will be valid for the chosen channel but we do recommend you add as much fields as possible because that will give the channel more information to show there visitors the right product resulting in a higher conversion rate.

Advanced possibilities

The attribute mapping tools are highly advanced and innovative. You can control the values you assign to the feed attributes and adjust them to meet your needs or those of the channel. This flexibility allows you to enhance the performance of the feed and boost your product sales in that channel.

8. Save and check your feed

When you’re done with the setup of your feed and have mapped the attributes you’re ready to save and generate the feed. Click the button “Save & Generate feed”

Feed list

The feed will be saved and generated on your server. You can continue editing, or you can click the “Feed List” button to open the feed list page, where you will find the feed. In the list, you can see details about the feed, such as the number of products, the status, and four available actions: edit, view, delete, and activate.

When you click on view the feed will be opened in a new browser screen where you can check the feed. The URL of the feed you can use in your channel.

Learn more about Saving and generating your product feed and working in the Feed list here >>