
E-commerce Checkout Best Practices
Why Your Checkout Process Holds the Key to Success
Picture this: a customer has browsed your store, fallen in love with a product, and added it to their cart. They’re just one step away from completing the purchase—but then, they leave. What happened? For many e-commerce businesses, the culprit lies in a frustrating or inefficient checkout process.
Here’s the hard truth: nearly 7 out of 10 online shopping carts are abandoned before checkout is complete. That’s a massive chunk of potential revenue slipping through your fingers. But here’s the good news—you can fix this! By optimizing your checkout process, you can significantly reduce cart abandonment rates and convert more browsers into buyers.
So, how do you make it happen? It’s all about creating a faster, smoother, and more trustworthy experience for your customers. Whether it’s simplifying forms, offering multiple payment options, or speeding up load times, small changes can make a big difference.
In this guide, we’ll walk you through e-commerce checkout best practices to help you:
- Speed up the process so customers don’t lose patience.
- Build trust with security features and social proof.
- Enhance the user experience by making checkout intuitive and mobile-friendly.
By implementing these actionable tips, you’ll not only improve conversions but also create a checkout experience that keeps customers coming back for more. Ready to turn abandoned carts into completed sales? Let’s dive in!
Why Checkout Optimization Matters
Cart abandonment is one of the biggest challenges e-commerce businesses face today. Imagine this: a customer has browsed your site, added items to their cart, and is ready to check out. But then, they leave without completing the purchase. This scenario happens more often than you think—nearly 70% of online shopping carts are abandoned, according to industry studies. That’s a significant amount of potential revenue slipping away.
The Financial Impact of Cart Abandonment
Let’s break it down. If your store generates $10,000 in monthly revenue with a 30% conversion rate, improving that rate by just a few percentage points could add thousands of dollars to your bottom line. On the flip side, a high cart abandonment rate means:
- Loss of revenue: Every abandoned cart represents money left on the table.
- Reduced customer lifetime value (CLV): Customers who abandon their carts may not return, reducing their overall spend with your business.
- Competitive disadvantage: If your checkout process frustrates users, they’ll likely shop elsewhere—possibly with your competitors.
Why Customers Abandon Their Carts
Understanding why shoppers leave mid-checkout is the first step toward solving the problem. Here are some common reasons:
- Unexpected Costs: Hidden fees like shipping or taxes at checkout can cause sticker shock and drive customers away.
- Complicated Checkout Processes: Long forms, multiple steps, or unclear instructions can frustrate users and make them quit.
- Lack of Payment Options: If customers don’t see their preferred payment method (e.g., PayPal or Apple Pay), they’re less likely to complete the purchase.
- Concerns About Security: Without visible trust signals like SSL certificates or secure payment badges, customers may hesitate to share sensitive information.
- Slow Load Times: A slow checkout page can make even the most patient shopper abandon their cart.
The Emotional Side of Frustration
Beyond technical issues, a poor checkout experience can leave customers feeling annoyed or distrustful of your brand. Think about it: if you’ve ever struggled with an overly complicated form or been surprised by unexpected fees at checkout, how likely were you to return to that store? Probably not very.
By addressing these pain points and optimizing your checkout process, you can reduce friction and create a smoother experience for your customers. In the next chapter, we’ll dive into actionable tips and best practices to help you achieve this—from simplifying forms to building trust with security features. Let’s turn those abandoned carts into completed sales!
E-commerce Checkout Best Practices
Your checkout process is where the magic happens—or doesn’t. A clunky, confusing, or slow experience can turn eager shoppers into abandoned carts. In this section, we’ll explore actionable tips to create a faster, more intuitive checkout process that builds trust and keeps customers coming back. Let’s start with the foundation: simplifying the checkout.
1. Simplify the Checkout Process
When it comes to checkout, simplicity reigns supreme. Think about it—your customer has already made the decision to buy. The last thing they want is to jump through hoops to complete their purchase. Here’s how you can make the process as smooth as possible:
Reduce Unnecessary Steps
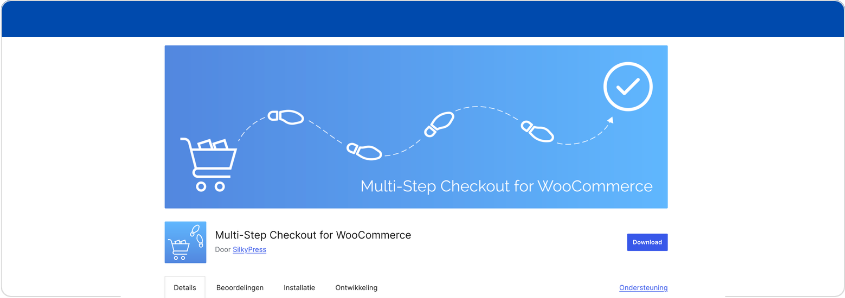
A long, multi-step checkout can frustrate customers and lead to drop-offs. Instead, aim for a one-page checkout or a streamlined multi-step process that’s easy to follow. WooCommerce offer plugins to help you implement this feature efficiently. For example, if you’re using WooCommerce, consider enabling a multi-step checkout plugin or customizing your page to condense all key actions—like entering shipping details, payment information, and reviewing the order—into just one or two steps.
Eliminate Redundant Form Fields
Every extra field in your checkout form is another opportunity for your customer to get frustrated and leave. Do you really need their company name or fax number? Probably not! Stick to the essentials:
- Name
- Email address
- Shipping address
- Payment details
To go even further, use smart tools that auto-detect customer information (like city and state) based on their zip code. This small tweak can save time and make the process feel effortless.
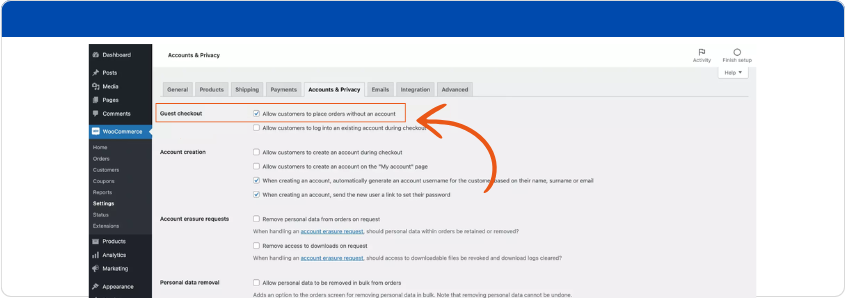
2. Offer Guest Checkout Options
Imagine this: a first-time shopper finds the perfect product in your store, adds it to their cart, and heads to checkout. But then they’re hit with a roadblock—they’re forced to create an account before completing their purchase. For many customers, this is where the journey ends. In fact, studies show that nearly 24% of shoppers abandon their carts when they’re required to register an account.
So, what’s the solution? Offer a guest checkout option. Here’s why it’s crucial:
- Convenience for First-Time Buyers: New customers may not be ready to commit to creating an account. Guest checkout allows them to complete their purchase quickly and hassle-free.
- Reduces Friction: By removing unnecessary steps, you make the process smoother and more appealing.
- Encourages Future Engagement: Once the purchase is complete, you can invite customers to create an account or sign up for your newsletter—on their terms.
In WooCommerce enabling guest checkout is simple and can be done in just a few clicks. Make sure this option is clearly visible at checkout to avoid confusion.
3. Provide Multiple Payment Methods
When it comes to payment options, one size doesn’t fit all. Customers have diverse preferences, and offering multiple payment methods ensures you cater to everyone’s needs. In fact, limited payment options are a common reason for cart abandonment.
Here are some must-have payment methods for your e-commerce store:
- Credit/Debit Cards: The most widely used option and a must-have for any store.
- Digital Wallets: Tools like PayPal, Apple Pay, and Google Pay offer quick and secure transactions that customers love.
- Buy Now, Pay Later (BNPL): Services like Klarna or Afterpay allow customers to split payments into installments—perfect for high-ticket items.
- Local Payment Methods: Depending on your target market, consider offering region-specific options like iDEAL in the Netherlands or Alipay in China.
By giving your customers flexibility at checkout, you remove one more barrier to completing a purchase. Most e-commerce platforms make it easy to integrate multiple payment gateways—so take advantage of these tools!
4. Optimize for Mobile Users
Did you know that over half of all e-commerce transactions now happen on mobile devices? Yet many online stores still struggle with clunky mobile checkouts that frustrate users and lead to drop-offs.
Here’s how you can create a mobile-friendly checkout experience:
- Responsive Design: Ensure your checkout page adjusts seamlessly to different screen sizes. Forms should be easy to read and fill out on smaller devices.
- Mobile Payment Options: Include options like Apple Pay or Google Pay that allow customers to check out with just a tap—no need to manually enter card details.
- Clickable Buttons and Fields: Make sure buttons are large enough for easy tapping, and avoid cramming too many elements onto one screen.
- Autofill Features: Enable autofill for shipping and payment details so users don’t have to type everything out manually.
A smooth mobile experience isn’t just a bonus—it’s essential in today’s e-commerce world. Test your checkout process on various devices regularly to ensure it works flawlessly across the board.
5. Speed Up Your Checkout Process
In the fast-paced world of e-commerce, speed is everything. A slow-loading checkout page can frustrate customers and lead to abandonment, even if they’re ready to buy. Research shows that a 1-second delay in page load time can reduce conversions by 7%—and that’s a hit no online store wants to take.
Here’s how you can ensure your checkout process is lightning-fast:
- Compress Images and Optimize Code
Large image files and bloated code can slow down your checkout page. Use tools like TinyPNG or ShortPixel to compress images without sacrificing quality. For code, remove unnecessary scripts and minify CSS, JavaScript, and HTML files to reduce load times. - Enable Browser Caching
Browser caching stores static elements like logos or stylesheets on the user’s device, so they don’t have to reload every time. This can significantly speed up the experience for returning customers. - Choose a Reliable Hosting Provider
Your hosting provider plays a huge role in site speed. Opt for a high-performance host that specializes in e-commerce platforms like WooCommerce or Shopify. - Optimize Payment Gateways
Slow payment processing can create frustrating delays. Test your payment gateways regularly and consider using faster options like Stripe or PayPal Express Checkout.
By prioritizing speed, you’ll not only improve the customer experience but also increase the likelihood of completing sales.
6. Show Total Costs Upfront
Few things are more frustrating for customers than unexpected costs at checkout. In fact, hidden fees are one of the top reasons shoppers abandon their carts. Transparency is key to building trust and reducing cart abandonment.
Here’s how to address this issue:
- Display All Costs Early
Show taxes, shipping fees, and any additional charges as soon as possible—ideally on the product page or in the cart summary before checkout begins. - Use a Shipping Calculator
Allow customers to estimate shipping costs based on their location before they proceed to checkout. Many e-commerce platforms offer plugins or built-in features for this. - Highlight Discounts and Promotions Clearly
If you’re offering free shipping or discounts, make it obvious! Display these perks prominently in the cart summary to reinforce value and encourage customers to complete their purchase.
By being upfront about costs, you’ll eliminate unpleasant surprises and build trust with your customers—two key factors in driving conversions.
7. Build Trust with Security Features
Trust is non-negotiable when it comes to online shopping. Customers need to feel confident that their personal and payment information is safe during checkout. Without visible security measures, many shoppers will hesitate—or abandon their cart altogether.
Here’s how you can reassure your customers:
- Use SSL Certificates
An SSL certificate encrypts data transferred between your site and your customers, ensuring sensitive information stays secure. The padlock icon in the browser bar is a visual cue that your site is trustworthy. - Display Trust Badges
Add recognizable trust badges from payment providers like Visa, MasterCard, PayPal, or Stripe near the payment section. These logos signal that your store uses secure payment methods. - Highlight Secure Payment Options
Mention specific security features of your payment gateways, such as fraud protection or encryption technology. - Include Clear Refund Policies
Reassure hesitant buyers by displaying links to refund or return policies prominently on the checkout page.
By implementing these security features, you’ll not only protect your customers but also create an environment where they feel safe completing their purchase.
8. Add Social Proof or Reassurance Elements
Trust is everything when it comes to online shopping, especially during checkout. Even at this final stage, subtle reminders can reinforce confidence and nudge customers toward completing their purchase. One of the most effective ways to do this is by incorporating social proof and reassurance elements.
How to Add Social Proof During Checkout
- Customer Reviews and Star Ratings: Display snippets of reviews or an average star rating near the cart summary. For example, “Rated 4.8/5 by 1,200 happy customers” can help validate the quality of your products and build trust.
- Testimonials or Endorsements: Include a short, genuine testimonial from a satisfied customer. This works particularly well for high-ticket items where buyers may need extra reassurance.
Reassurance Elements That Build Confidence
- Guarantees: Highlight promises like “100% Satisfaction Guaranteed” or “Free Returns” near the payment section. These statements reduce hesitation and make customers feel secure about their purchase.
- Secure Payment Icons: Add logos of trusted payment providers (e.g., Visa, PayPal, Apple Pay) alongside security badges like SSL certificates. These visual cues reassure customers that their personal information is safe.
By strategically placing these elements on your checkout page, you create a sense of trust that encourages customers to complete their transactions confidently.
9. Enable Autofill and Save Payment Details
Nobody enjoys filling out forms—especially when they’re in a hurry to check out. That’s why enabling autofill features and offering secure payment storage can be game-changers for your e-commerce store.
Why Autofill Matters
Autofill allows customers to quickly populate fields like shipping address or payment details with stored information from their browser or device. This not only saves time but also reduces errors, making the checkout process smoother and faster.
The Benefits of Saving Payment Details
For returning customers, offering the option to securely save payment details can significantly speed up future purchases. Here’s how it helps:
- Convenience: Customers don’t need to re-enter their card information every time they shop.
- Increased Loyalty: A seamless experience encourages repeat purchases and builds long-term relationships with your brand.
How to Implement These Features Safely
- Use secure payment gateways like Stripe or PayPal that support tokenization (a method of encrypting sensitive data).
Clearly communicate that saved payment details are stored securely and will never be shared. - By reducing friction with autofill and saved payment options, you’ll create a checkout experience that feels effortless—exactly what today’s shoppers expect.
10. Add Progress Indicators
Uncertainty can be a major roadblock during checkout. Customers want to know how far along they are in the process and what steps remain. That’s where progress indicators come in—they provide clarity, reduce anxiety, and improve user confidence.
Why Progress Indicators Work
A simple progress bar or step tracker gives customers a visual representation of where they are in the checkout journey. For example:
- Step 1: Shipping Information
- Step 2: Payment Details
- Step 3: Review Order
This transparency reassures users that they’re almost done, encouraging them to stick with the process instead of abandoning their cart.
Best Practices for Adding Progress Indicators
- Keep It Simple: Use clean, intuitive designs that are easy to understand at a glance.
- Highlight Completed Steps: Clearly mark finished sections (e.g., with checkmarks) so customers see their progress.
- Avoid Overloading Steps: Break down the process into logical chunks without making it feel unnecessarily long.
Progress indicators are especially helpful for multi-step checkouts but can also work well on one-page layouts by visually grouping sections. They guide users through the process while making it feel manageable and straightforward.
Optimizing your checkout process is about creating a seamless, intuitive, and trustworthy experience that encourages customers to complete their purchase. From simplifying the steps and offering guest checkout to providing multiple payment methods and speeding up load times, every small improvement can make a big difference. By incorporating social proof, enabling autofill, and adding progress indicators, you’re not just reducing friction—you’re building confidence and loyalty with your shoppers.
With these e-commerce checkout best practices in place, you’re well on your way to turning abandoned carts into completed sales. But what happens when customers still leave without buying? In the next chapter, we’ll explore how strategic follow-ups and analytics can help recover lost sales and continuously refine your checkout process. Let’s keep the momentum going!
Reducing Cart Abandonment with Strategic Follow-Ups
Even with an optimized checkout process, some customers will inevitably abandon their carts. But don’t worry—this doesn’t have to mean a lost sale. With the right follow-up strategies, you can re-engage these customers and encourage them to complete their purchase. Let’s explore how to effectively use abandoned cart emails, offer enticing incentives, and retarget customers through personalized ads.
Using Abandoned Cart Emails Effectively
Abandoned cart emails are one of the most powerful tools in your e-commerce arsenal. They allow you to reconnect with customers who left mid-checkout and gently nudge them back toward completing their purchase. Here’s how to make them work:
1. Timing Is Everything
Send the first email within 1-2 hours of cart abandonment. Many shoppers simply get distracted or forget, so a quick reminder can be enough to bring them back. Follow up with a second email 12-24 hours later, and a final nudge within 48-72 hours.
2. Personalize Your Emails
Personalization goes beyond just using the customer’s name. Include the specific items they left in their cart, along with product images and details. For example: “Hey [Name], we noticed you left [Product Name] in your cart—don’t miss out!” This approach reminds them of what they loved about the product in the first place.
3. Add Value with Incentives
If the first email doesn’t do the trick, sweeten the deal in your follow-ups:
- Offer a small discount (e.g., 10%) or free shipping to encourage them to complete their purchase.
- Use urgency by highlighting limited-time offers: “Your 10% discount expires in 24 hours!”
4. Keep It Friendly and Mobile-Friendly
Avoid being overly pushy—focus on being helpful instead. A friendly tone combined with a clear call-to-action (e.g., “Complete My Order”) works wonders. Also, ensure your emails are mobile-optimized since many customers will open them on their phones.
Offer Incentives to Recover Lost Sales
Sometimes, all it takes is a little extra motivation to convert hesitant shoppers into buyers. Incentives like discounts or free shipping can tip the scales in your favor:
- Discount Codes: Provide a unique coupon code for abandoned cart users (e.g., “SAVE10”). Make sure to emphasize exclusivity and urgency: “This offer is just for you—expires in 24 hours!”
- Free Shipping: Shipping costs are a common reason for cart abandonment. Highlighting free shipping as part of your follow-up can remove this barrier entirely.
- Bundled Offers: Suggest complementary products or bundle discounts for higher-value carts: “Complete your order today and get [Product Name] at 20% off!”
These small gestures show customers that you value their business and make it easier for them to say yes.
Retarget Customers with Personalized Ads
Retargeting ads are another effective way to recover abandoned carts by keeping your products top-of-mind for potential buyers. Here’s how to use them strategically:
1. Dynamic Product Ads
Platforms like Facebook and Google allow you to create dynamic ads that automatically display the exact products customers left behind in their cart. These ads feel highly personalized and remind users of what they were considering purchasing.
2. Use Urgency and Social Proof
Incorporate urgency into your ad copy: “Your favorite items are almost gone—get them now!” Pair this with social proof like star ratings or customer reviews to build trust and encourage action.
3. Target Across Platforms
Expand your reach by retargeting customers on multiple platforms where they’re most active, such as Facebook, Instagram, or even YouTube. For example, Facebook Dynamic Product Ads can automatically pull from your product catalog to show tailored ads based on browsing behavior.
4. Set Up Frequency Caps
While retargeting is powerful, overdoing it can annoy potential customers. Limit how often users see your ads to avoid coming across as pushy.
By combining timely abandoned cart emails, enticing incentives, and personalized retargeting ads, you’ll create a multi-channel strategy that keeps your brand front-and-center while encouraging customers to complete their purchase. In the next chapter, we’ll focus on testing and analyzing your checkout process so you can continuously improve performance and maximize conversions!
Testing and Analyzing Your Checkout Process
Your checkout process is never truly “finished.” To keep your e-commerce store competitive and maximize conversions, you need to test, analyze, and refine it continuously. This chapter will show you how to use A/B testing and analytics tools to identify weak points in your checkout funnel and optimize for success.
A/B Testing: Experiment Your Way to Better Conversions
A/B testing (also known as split testing) is a powerful way to determine what works best for your checkout process. By comparing two versions of a single element, you can see which one drives more conversions. Here’s how to get started:
1. Key Elements to Test
Focus on small but impactful changes that could influence customer behavior:
- Button Colors: Test whether a bright “Place Order” button outperforms a more subdued one.
- CTA Text: Try variations like “Complete Purchase” vs. “Finish Checkout” to see which resonates better.
- Form Layouts: Experiment with one-column vs. two-column layouts for input fields.
- Trust Signals: Test the placement or visibility of trust badges near the payment section.
2. Run Controlled Experiments
Only test one element at a time to ensure accurate results. For example, if you’re testing button colors, don’t change the CTA text simultaneously—this could skew your data.
3. Measure Results
Track metrics like conversion rate, time spent on the page, and cart abandonment rate to determine which version performs better. Most e-commerce platforms, including WooCommerce and Shopify, support A/B testing plugins or integrations.
Pinpoint Drop-Off Points with Analytics
Understanding where customers abandon the checkout process is critical for identifying areas that need improvement. Analytics tools like Google Analytics or Hotjar can provide valuable insights into user behavior.
1. Use Funnel Visualization Reports
Google Analytics allows you to set up a funnel visualization report that tracks each step of your checkout process. This helps you pinpoint where customers are dropping off—for example:
- Are they leaving after entering their shipping information?
- Do they abandon the page when payment details are requested?
2. Heatmaps and Session Recordings
Tools like Hotjar or Crazy Egg show heatmaps and session recordings that reveal how users interact with your checkout page:
- Are they struggling with specific fields?
- Are they clicking on non-interactive elements out of confusion?
3. Monitor Key Metrics
Keep an eye on these critical metrics:
- Cart Abandonment Rate: The percentage of users who add items to their cart but don’t complete the purchase.
- Checkout Completion Rate: The percentage of users who successfully finish the checkout process.
- Page Load Time: Slow-loading pages can lead to drop-offs—ensure your checkout loads in under 3 seconds.
Optimize Based on Insights
Once you’ve identified problem areas through testing and analytics, it’s time to make data-driven improvements:
- Simplify steps that show high abandonment rates (e.g., consolidating multi-step checkouts).
- Remove or adjust confusing elements highlighted in heatmaps or session recordings.
- Retest after implementing changes to ensure they have a positive impact.
By continuously testing and analyzing your checkout process, you’ll uncover opportunities to improve conversions and reduce friction for your customers. In the final chapter, we’ll recap everything you’ve learned and highlight how these strategies can transform your e-commerce store into a conversion powerhouse!
The Payoff of a Better Checkout Experience
Your checkout process is the final step in turning browsers into buyers, and as we’ve explored throughout this guide, optimizing it can have a transformative impact on your e-commerce business. By focusing on speed, trust, and user experience, you’re not just improving conversions—you’re building a foundation for sustainable growth.
Let’s quickly recap the key e-commerce checkout best practices we’ve covered:
- Simplify the Checkout Process: Reduce unnecessary steps and eliminate redundant fields to make purchasing quick and easy.
Offer Guest Checkout Options: Remove barriers for first-time buyers by allowing them to check out without creating an account. - Provide Multiple Payment Methods: Cater to diverse customer preferences with options like credit cards, PayPal, Apple Pay, and Buy Now, Pay Later services.
- Optimize for Mobile Users: Ensure your checkout is mobile-friendly with responsive design and mobile payment options.
Speed Up Your Checkout Process: Compress images, streamline code, and enable browser caching to reduce load times. - Show Total Costs Upfront: Build trust by being transparent about taxes, shipping fees, and other costs early in the process.
Build Trust with Security Features: Reassure customers with SSL certificates, trust badges, and secure payment gateways. - Add Social Proof or Reassurance Elements: Include customer reviews, star ratings, and guarantees like “100% Secure Payment” or “Free Returns.”
- Enable Autofill and Save Payment Details: Speed up repeat purchases by offering autofill features and secure payment storage.
Add Progress Indicators: Use visual cues like progress bars to reduce uncertainty and guide customers through checkout.
We also explored how to recover lost sales through strategic follow-ups like abandoned cart emails, incentives such as discounts or free shipping, and retargeting ads that keep your brand top-of-mind. Finally, we highlighted the importance of testing and analyzing your checkout process to continuously refine it for better results.
Small Changes, Big Impact
The beauty of these strategies is that they don’t require a complete overhaul of your site. Small tweaks—like simplifying forms or adding a progress bar—can have an outsized impact on your bottom line. Every improvement you make reduces friction for your customers and increases their likelihood of completing their purchase.
Remember: a better checkout experience doesn’t just mean fewer abandoned carts; it means happier customers who are more likely to return and recommend your store to others. Each step you take toward optimizing your checkout process is an investment in long-term success.
Your Next Move
Now it’s time to put these tips into action! Start by identifying one or two areas where your checkout process could improve—whether it’s simplifying steps, speeding up load times, or adding trust signals—and implement those changes today. Test the results, learn from the data, and keep refining.
Your e-commerce store has incredible potential. By creating a fast, trustworthy, and user-friendly checkout experience, you can unlock higher conversions, greater customer satisfaction, and sustained revenue growth. Let’s make those abandoned carts a thing of the past!


Leave a Reply
Want to join the discussion?Feel free to contribute!